
How To Achieve A Perfect Crust In Gluten-Free Bread
Understanding Gluten-Free Flour Blends
Achieving an ideal crust on gluten-free bread requires a deep understanding of gluten-free flour blends and their distinctive properties. Gluten, the protein complex in wheat, is answerable for the elasticity and construction that enables for a crisp crust in traditional bread. Since gluten is absent in gluten-free baking, we need to rigorously select and mix elements to mimic its function.
Gluten-free flour blends usually consist of a combination of starches and flours, every contributing totally different traits. Common elements include:
Rice flour: Provides lightness and a slightly candy style, but lacks structure.
Tapioca starch/flour: Adds moisture and binding, creating a softer crumb.
Potato starch/flour: Similar to tapioca starch, contributing to a light-weight texture.
Sorghum flour: Offers a slightly nutty taste and some structure.
Almond flour: Adds richness and taste, but may end up in a denser loaf if overused.
Cassava flour: Provides a lightweight and barely grainy texture.
Buckwheat flour: While containing no gluten, offers a novel taste and some structure, though it’s usually utilized in smaller proportions.
Teff flour: A slightly nutty flour that gives some binding properties.
The key to an ideal gluten-free crust lies find the right stability of these components. A mix too heavy on starches will lead to a pale, gummy crust, while one missing sufficient binding brokers will produce a crumbly, uneven crust.
Choosing the proper flour blend is extremely dependent in your recipe and desired consequence. Some blends are specifically formulated for bread making, containing added xanthan gum or guar gum, which help to create elasticity and construction, thus selling browning and crispness.
Here’s a breakdown of methods to enhance crust formation:
Use a high-protein mix: Look for blends that specifically advertise themselves as being good for bread making. These often contain a better proportion of flours that present structure.
Add binding agents: Xanthan gum or guar gum are important for gluten-free baking, mimicking a few of the features of gluten. They improve elasticity and assist create a firmer crust.
Control moisture: Too a lot moisture will lead to a soggy crust. Carefully measure your liquids and think about using slightly less than the recipe calls for, especially in case your blend is understood to be fairly absorbent.
High baking temperature: Baking at a higher temperature (around 400-425°F or 200-220°C) promotes browning and crispness. This can usually be accomplished in the course of the tip of baking as nicely to create a pleasant crust.
Steam injection: Introducing steam into the oven in the course of the preliminary phases of baking helps create a crispier crust. You can obtain this by inserting a pan of water in the oven or by using a steam-injection oven.
Egg wash or oil spray: Brushing the loaf with an egg wash or a lightweight oil spray earlier than baking helps to create a shiny, golden-brown crust.
Experimentation: The best strategy is commonly trial and error. Keep notes on your outcomes, regulate your flour mix and technique based on what you study, and shortly you may find your excellent gluten-free crust.
Remember to always follow the particular directions of your chosen recipe and modify based mostly on your flour mix and oven’s traits. With apply and attention to detail, you can grasp the art of making a scrumptious, perfectly crisp crust on your gluten-free bread.
Achieving an ideal crust on gluten-free bread presents unique challenges, primarily as a outcome of absence of gluten, the protein network answerable for structure and elasticity in conventional wheat-based bread.
Gluten-free flour blends sometimes comprise several starches and different ingredients to imitate gluten’s role. Understanding these elements is essential for crust improvement.
Starches, corresponding to tapioca starch, potato starch, and rice flour, type the bottom of most gluten-free blends. They contribute to the texture and crumb construction, however alone, they lack the flexibility to create a crisp, browned crust.
Tapioca starch, with its high amylose content, provides a light, fluffy crumb, but contributes less to browning. Potato starch presents comparable traits. Rice flour, relying on its type (brown, white, short-grain), provides varying ranges of construction and moisture retention.
Other ingredients play very important roles in crust formation. Xanthan gum or guar gum are common additions, performing as binding brokers that provide some structural integrity, albeit not as successfully as gluten. These gums help to compensate for the lack of gluten’s elasticity and create a more cohesive dough.
The ratio of various starches throughout the mix considerably influences the final crust. Blends with a better proportion of tapioca or potato starch may end in a paler, softer crust. A mix richer in brown rice flour might provide a slightly darker and chewier crust.
Careful consideration of the hydration degree is paramount. Gluten-free doughs usually require much less water than wheat-based doughs. Over-hydration results in a gummy inside and a soggy crust, while under-hydration results in a dry, crumbly texture.
The baking temperature and time also affect crust development. Higher temperatures promote browning and crispness, but can result in burning if the dough is not correctly hydrated or the baking time is simply too long. A barely decrease temperature for an extended length could produce a greater crust in some cases.
Pre-baking strategies can significantly enhance crust growth. A transient pre-bake of the dough in a decrease temperature oven, creating a partial crust, allows for higher browning and prevents a soggy backside.
Adding fats like olive oil or melted coconut oil can contribute to a more tender crumb and a slightly crispier crust by growing moisture retention and promoting browning throughout baking.
Experimentation with completely different flour blends and baking strategies is vital to discovering the optimal mixture on your desired crust. The proportion of starches, the addition of gums, and the baking technique all work together to find out the final end result.
Using a baking stone or metal improves warmth distribution, promoting even browning and a crisper crust. The floor of the baking stone also helps to wick away extra moisture.
Finally, using a steam injection methodology throughout baking, launched both through a twig bottle or by putting a pan of water within the oven, creates a more humid environment, which might result in a better rise and probably a more even crust coloration.
Careful attention to these factors – starch choice, hydration, baking temperature and time, and pre-baking techniques – allows gluten-free bakers to achieve a fascinating crust, overcoming the restrictions of gluten-free flours.
Even with these strategies, the crust of gluten-free bread may differ from wheat bread. It’s essential to understand that a “good” crust in the gluten-free context may not exactly mirror the characteristics of a wheat-based bread crust.
Achieving an ideal crust on gluten-free bread is a challenge, primarily because of the absence of gluten, the protein liable for elasticity and structure in conventional wheat-based bread.
Gluten-free flour blends often lack the power to lure gases produced during fermentation, leading to dense, crumbly loaves with weak crust development.
Therefore, understanding gluten-free flour blends and incorporating effective binding agents is crucial.
Gluten-free flour blends sometimes include a mix of starches and flours from sources like rice, tapioca, potato, almond, and sorghum. Each flour contributes distinctive properties: some present construction, others add moisture retention, and others improve flavor.
However, no single flour replicates gluten’s performance. This necessitates careful blend choice and the utilization of supplementary components.
The key to a great crust is achieving the proper balance of moisture and structure throughout the dough.
Too much moisture results in a soggy crust, while too little leads to a dry, brittle one.
Here’s where binding agents come into play.
These brokers help to create a cohesive dough, mimicking a few of gluten’s structural roles.
Popular binding agents include:
Xanthan gum: This is arguably the most typical binding agent. It improves dough elasticity, serving to to entice gases and create a better rise. It additionally enhances moisture retention, leading to a softer crumb.
Guar gum: Similar to xanthan gum, guar gum supplies binding and moisture retention. It can usually be used in smaller portions than xanthan gum.
Psyllium husk powder: This fiber-rich ingredient adds structure and moisture, contributing to a extra cohesive dough and improved crumb texture. It can be used alone or together with different binding agents.
Potato starch: While a primary ingredient in many gluten-free blends, potato starch enhances the ultimate dough’s structure when used judiciously. It absorbs extra liquid, stopping a soggy crumb.
Tapioca starch: This creates a lighter, airier texture, which may be useful for preventing a dense crust.
The quantity of binding agent wanted is determined by the particular flour blend and recipe. Experimentation is crucial. Start with the recommended quantity in your recipe and adjust as needed based on the dough’s consistency.
Beyond binding brokers, other factors affect crust development:
Baking temperature and time: Higher temperatures and longer baking instances sometimes contribute to a crispier crust. Experimentation is key to finding the optimal combination in your oven and recipe.
Steam: Introducing steam to the oven through the initial baking section helps to create a wonderful, evenly browned crust. This can be achieved by putting a pan of water in the oven or utilizing a steam injection system.
Egg wash or milk wash: A simple egg wash or milk wash brushed onto the loaf before baking creates a glossy finish and helps enhance browning.
In conclusion, attaining a perfect crust on gluten-free bread requires understanding the constraints of gluten-free flour blends and successfully using binding brokers. By rigorously deciding on your flour mix, using the proper binding brokers within the acceptable proportions, and optimizing baking conditions, you presumably can significantly improve the feel and look of your gluten-free bread.
Remember that achieving the perfect crust is often an iterative course of. Don’t be afraid to experiment with completely different flour blends, binding agents, and baking strategies to discover the mixture that works finest for you and your recipe for gluten free bread.
Mixing Techniques for Optimal Gluten-Free Dough
Achieving an ideal crust on gluten-free bread requires a nuanced understanding of mixing techniques and the critical role of hydration.
Unlike gluten-containing doughs, gluten-free doughs lack the elastic network shaped by gluten proteins. This means they behave in a different way and require a extra delicate method to mixing.
Overmixing is a standard mistake that results in a troublesome, dense crust and crumb. The aim is to combine elements totally with out creating excessive heat or overworking the dough.
The best method is commonly a mixture of techniques. Start with a low pace on a stand mixer or gently combine ingredients by hand. This preliminary mixing should incorporate the dry ingredients and moist components (including liquids and eggs) simply till they type a cohesive mass.
Avoid using a excessive velocity, as this will introduce an excessive quantity of air, resulting in a crumbly texture and possibly a cracked crust.
The correct hydration level is paramount. Gluten-free flours absorb liquids in a special way than wheat flour. Too little hydration leads to a dry, crumbly dough that won’t type a smooth crust, whereas an extreme amount of will produce a sticky, unmanageable dough.
Experimentation is essential. Begin with the liquid amounts specified in your recipe but be ready to regulate. A slightly wetter dough usually yields a better crust, because it permits for more even growth during baking. The dough must be slightly sticky but still manageable.
For added structure and a crispier crust, contemplate adding binders like xanthan gum, guar gum, or psyllium husk. These hydrocolloids help to mimic the function of gluten, enhancing the dough’s elasticity and cohesion.
Incorporate these binders steadily, as too much can lead to a gummy or slimy texture. Start with the lower end of the beneficial quantity and adjust as wanted.
Another essential issue is the type of gluten-free flour blend. Different blends have various absorption charges, influencing the required hydration levels. Read the particular instructions on your blend’s package deal.
Resting the dough after mixing is a vital step. Allowing the dough to rest for a minimum of half-hour (and up to a number of hours, depending on the recipe) offers the starches and binders time to hydrate fully, leading to a more cohesive and pliable dough. This improves the crust’s texture and colour.
Baking techniques also affect the crust. Preheat your oven totally. Using a baking stone or a cast iron skillet will improve the crust’s browning and crispness. Basting the crust with water or milk throughout baking can improve shade and texture.
Finally, consider using high-heat baking techniques. A greater oven temperature for the primary part of the baking process contributes to the formation of a great crust. You might lower the temperature later in baking to make sure the within cooks thoroughly.
By mastering these methods, understanding the influence of hydration, and taking notice of the nuances of your chosen flour blend, you’ll be well on your method to creating completely crusty gluten-free bread.
Don’t be discouraged in case your first attempts aren’t perfect. Gluten-free baking takes apply. Keep experimenting with hydration ranges, mixing methods, and baking times to find the right steadiness for your most popular recipe and flour blend.
Achieving an ideal crust on gluten-free bread requires a fragile strategy to mixing, as the absence of gluten necessitates gentler strategies to keep away from overworking the dough.
One essential aspect is the kind of mixing bowl you utilize. Opt for a large, extensive bowl that allows for easy folding and prevents the dough from changing into too compressed.
Avoid using a stand mixer with a dough hook, as its aggressive action can easily damage the delicate construction of gluten-free flour blends.
Instead, embrace the art of mild hand mixing. Start by combining the dry elements – gluten-free flour blend, xanthan gum (or other binding agents), sugar, salt, and leavening agents – in your chosen bowl. Whisk completely to ensure even distribution.
In a separate bowl, combine the moist elements: liquids (water, milk, eggs), oil, and any flavourings. Mix these gently until well mixed.
Gradually add the moist components to the dry components, using a large spoon or spatula. The key right here is to keep away from vigorous stirring.
Instead, use a folding technique, gently incorporating the moist ingredients into the dry, making sure not to overmix. This folding motion minimizes gluten growth (which you wish to keep away from in gluten free baking), and helps distribute moisture evenly.
Overmixing gluten-free dough ends in a troublesome, dense loaf with a poor crumb structure. Undermixing results in a crumbly texture and uneven cooking.
The goal is to mix the components just until a cohesive dough varieties. There ought to still be some seen dry patches. This is essential for attaining a lighter, airier texture.
Once combined, gently form the dough into a loaf or desired form. Handle it as little as possible to prevent compression.
Depending on the recipe, you might need to relaxation the dough earlier than baking. This allows the gluten-free flour to completely hydrate and helps the dough relax, contributing to a better final texture and crust improvement.
For optimal crust growth, consider the baking circumstances. High warmth at the start of baking helps create a crisp crust, whereas a barely lower temperature towards the top ensures even baking.
Experiment with different baking pans. Darker-colored pans absorb heat extra effectively, contributing to a crispier crust. You might even think about using parchment paper to forestall sticking and permit for even browning.
Adding a finishing spray of water or milk to the surface of the bread earlier than baking can enhance crust browning and create a glossy end.
Finally, remember that the type of gluten-free flour mix significantly impacts the ultimate product. Some blends produce naturally crispier crusts than others. Experiment to search out what works best for you and your recipe.
Ultimately, attaining the perfect gluten-free crust is a journey of mild mixing, cautious handling, and thoughtful baking strategies. Master these, and you may be rewarded with fantastically browned, satisfying loaves.
- Use a big, broad bowl.
- Avoid a stand mixer with a dough hook.
- Combine dry ingredients individually.
- Combine wet components individually.
- Gradually add wet to dry, folding gently.
- Do not overmix.
- Shape the dough minimally.
- Allow for dough rest (if required).
- Use high initial heat and slightly lower temperature in direction of the tip.
- Consider darker pans or parchment paper.
- Use a ending spray earlier than baking.
- Experiment with different gluten-free flour blends.
Gluten-free baking presents unique challenges, primarily the absence of gluten, the protein community responsible for structure and elasticity in conventional doughs.
Mastering gluten-free dough mixing is crucial for achieving an ideal crust.
Overmixing is a typical mistake, leading to tough, rubbery results. The delicate nature of gluten-free flours requires a gentler method.
Start with exact measurements. Using a kitchen scale ensures accuracy, very important for constant results.
Combine dry components thoroughly before including moist components. This prevents pockets of dry flour that gained’t hydrate correctly.
Gradually incorporate moist ingredients, starting with liquids and then adding any eggs or oils.
Mix solely until just combined. Avoid overmixing. A few lumps are acceptable, and even preferable, as overmixing will develop the gluten substitutes, leading to a troublesome crust.
The aim is to hydrate the starches and binding agents without over-developing them. Think of it as a mild folding quite than a vigorous kneading.
The kind of mixer matters. A stand mixer with a paddle attachment is appropriate for many gluten-free doughs, however use the bottom velocity setting.
Hand mixing can present more management, allowing you to really feel the texture and cease as quickly as the elements are fully integrated.
Using a dough scraper may be helpful to scrape down the sides of the bowl and guarantee even mixing with out overworking the dough.
Don’t be tempted to add extra flour to compensate for a sticky dough. Adding extra flour will solely result in a drier, crumblier crust.
Instead, let the dough rest for a period – often 15-30 minutes – earlier than shaping.
This relaxation interval permits the starches to fully hydrate and the binding brokers to develop, leading to a better texture and simpler handling.
Consider the kind of gluten-free flour blend you are using. Each mix has distinctive traits, so you would possibly want to regulate your mixing method accordingly.
Some blends require barely extra mixing than others, however at all times err on the side of undermixing.
Experiment with different mixing strategies and rest occasions to find the optimum strategy on your specific flour mix and recipe.
For a crispier crust, consider pre-baking the crust earlier than including the filling (for pies, tarts, etc.). This helps to set the base and prevent sogginess.
Brushing the crust with milk or egg wash before baking enhances browning and creates a beautiful, glossy finish.
Baking at the correct temperature is essential. Too low, and the crust may be pale and undercooked; too excessive, and it would burn before the within is done.
Using a baking stone or steel can improve crust crispness by offering even warmth distribution.
Don’t open the oven door regularly while baking, as this can trigger temperature fluctuations and affect crust growth.
Once baked, let the bread cool completely on a wire rack before slicing. This permits the crust to set and prevents it from turning into soggy.
Practice makes good. Don’t be discouraged in case your first few makes an attempt aren’t flawless. With expertise, you’ll develop a really feel for the best gluten-free dough consistency and obtain that perfect crust each time.
Achieving the Right Texture
Achieving the proper crust on gluten-free bread requires meticulous attention to element, significantly concerning texture and dough temperature. Gluten-free doughs, missing the elasticity of wheat-based doughs, present distinctive challenges.
The absence of gluten means achieving construction relies closely on starches and binding agents like xanthan gum or psyllium husk. These elements interact in a unique way with water at various temperatures, significantly affecting the final texture.
Controlling Dough Temperature: A Crucial Step
Too cold a dough will end in a dense, gummy inside, while excessive warmth can lead to a crumbly, dry loaf. The perfect dough temperature sometimes falls between 70-75°F (21-24°C). This vary allows for optimal starch gelatinization and the correct activation of any added enzymes.
Measuring the temperature precisely is crucial. Use a reliable instant-read thermometer to verify the temperature of your components, particularly your liquids, before combining them.
Cold elements, particularly water and eggs, will lower the general dough temperature, doubtlessly slowing down fermentation and hindering gluten-free binding agents from functioning optimally.
Conversely, excessively warm components can accelerate fermentation, leading to uneven rising and a less desirable crumb construction. Overly warm dough can even denature the proteins in your binding brokers, lowering their effectiveness.
Techniques for Temperature Control
Use room-temperature components: Allow liquids, eggs, and even dairy products to come back to room temperature earlier than incorporating them into the dough.
Warm liquids progressively: If using cold liquids, warm them gently over low warmth, continuously monitoring their temperature.
Chill the dough (if necessary): If your dough becomes too heat, briefly chill it within the refrigerator to decelerate fermentation. This could be significantly useful in warmer climates.
Strategic ingredient additions: Adding some chilly components (e.g., a small amount of ice water) close to the tip of mixing may help cut back the overall dough temperature if it will get too heat.
Work rapidly: Avoid prolonged kneading, which generates heat. Gluten-free doughs sometimes require much less manipulation than wheat doughs.
Achieving the Right Texture: Beyond Temperature
While temperature control is crucial, other elements also influence the ultimate texture:
Proper hydration: Too a lot water will result in a sticky, gummy dough, whereas too little will yield a dry, crumbly loaf. The ideal hydration level varies depending on the specific recipe and ingredients.
Careful mixing: Over-mixing may find yourself in a tricky, dense texture. Mix solely until the ingredients are just mixed.
Baking time and temperature: Follow the recipe’s baking directions exactly. Adjust baking time if needed based on your oven and the scale of your loaf.
Use of binding brokers: Experiment with totally different ratios and types of binding brokers (xanthan gum, psyllium husk, and so on.) to find what works finest for your recipe and preferences.
Adding fats: Fats like oil or melted butter can contribute to a softer crumb and help prevent dryness.
Mastering the Art of Gluten-Free Baking
Achieving the right crust on gluten-free bread is a journey of experimentation and refinement. By rigorously monitoring and controlling dough temperature, and understanding the position of other elements, you’ll be able to considerably enhance your possibilities of making a delicious, superbly textured loaf.
Remember that consistency is essential. Once you find a mixture of methods and ingredients that work for you, stick with them to supply persistently satisfying results.
Achieving a perfect crust on gluten-free bread requires a nuanced approach, as the lack of gluten necessitates alternative methods for structure and texture growth.
One essential side is fats incorporation. Gluten provides elasticity and construction, permitting for the trapping of gases during fermentation, resulting in a light and ethereal crumb. Gluten-free flours, however, lack this inherent elasticity. Therefore, fats performs a important function in emulating this impact, contributing to a young crumb and a fascinating crust.
The kind of fats matters significantly. Oils, such as olive oil or avocado oil, add moisture and contribute to a softer, extra tender crumb however could hinder crust development. Their low melting level can lead to a less crisp crust.
Butter, on the other hand, incorporates both fat and water, providing moisture and richness while also contributing to a extra developed crust. The higher melting point of butter permits for higher browning and crisping in the oven.
Shortening, with its high fats content material and solid consistency at room temperature, can create a tender crumb, but its lack of water can lead to a drier crust. Therefore, it usually must be mixed with other fats or further liquid.
The amount of fat is equally crucial. Too little fat results in a dry, crumbly bread with a weak crust. Too a lot fat makes the bread overly soft and greasy, preventing proper browning and crust formation.
Experimentation is key to discovering the ideal fat ratio in your chosen gluten-free flour mix. Start with a recipe that provides a guideline, and then modify the fats content material in subsequent batches. Note the modifications in crumb and crust texture with each adjustment.
Beyond the kind and amount of fats, other components affect crust development:
Baking Temperature and Time: Higher temperatures generally promote crispier crusts, however over-baking can result in dryness. Monitor your bread closely.
Steam: Injecting steam into the oven through the preliminary stages of baking helps create a crisp crust by providing a moist setting that permits for better enlargement and browning earlier than the surface dries out.
Flour Blend: Different gluten-free flour blends have various moisture absorption and fat-binding capacities. A mix containing xanthan gum or another binding agent would possibly require much less fat than a mix that lacks it.
Egg Whites (Optional): Adding egg whites can boost structure, serving to to forestall a gummy texture and improve crust colour and crispness.
Pre-baking: Some recipes recommend a quick initial baking period to partially set the loaf, allowing for higher crust formation in the final bake.
By rigorously considering the kind and amount of fats, alongside baking temperature, steam, and flour selection, you’ll find a way to significantly improve your probabilities of reaching a superbly crisp and flavorful crust on your gluten-free bread.
Remember, attaining the perfect crust is an iterative process. Keep detailed notes of your experiments, recording the elements, ratios, and baking situations to refine your technique over time.
Achieving a crisp, golden-brown crust on gluten-free bread requires a unique method than conventional baking.
Gluten’s absence means the dough lacks the elasticity and power to create oven spring and a naturally sturdy crust.
Therefore, pre-baking techniques turn into crucial.
One effective methodology is the blind bake. This entails pre-baking the crust before including the wet elements and baking again.
Start by making ready your gluten-free dough in accordance with your recipe, but maintain it dry – just enough liquid to bind the ingredients.
Press the dough firmly into your ready baking pan or loaf tin, making certain a fair thickness.
Prick the base of the dough generously with a fork to forestall air bubbles from forming and creating an uneven crust.
Next, parchment paper is significant for straightforward elimination and prevents sticking.
Line your pan and place weights (such as dried beans or rice) evenly throughout the dough.
This step prevents the crust from puffing up unevenly during the initial baking.
Bake at a average temperature (around 350°F or 175°C) for 15-20 minutes, or till the sides start to look slightly set and pale golden.
Remove the weights and parchment paper.
Carefully add your wet elements (usually the remaining liquids and eggs) to the partially baked crust.
Use a spoon or spatula to gently unfold them evenly.
For added taste and texture, consider incorporating emulsifiers, corresponding to xanthan gum or guar gum, to improve the crust’s construction.
These help bind moisture and give the crust a more sturdy character.
Alternatively, think about using a starch-based coating.
Dusting the surface of the partially baked crust with tapioca starch or potato starch before adding the wet components can help create a crisp layer.
This technique is especially efficient for breads with excessive moisture content material, which might in any other case result in a soggy crust.
After adding the wet elements, bake the bread in accordance with your recipe’s instructions till it is cooked by way of.
For a fair crispier crust, you possibly can swap to broil for the last few minutes of baking, keeping an in depth eye to keep away from burning.
Using a pizza stone or baking steel can considerably improve crust texture.
These surfaces retain heat effectively, creating a greater oven spring and a crisper bottom crust.
Remember to preheat the stone or metal completely before putting your bread within the oven.
Experiment with totally different pre-baking methods and combos to find what works finest in your specific gluten-free recipe and oven.
Paying close consideration to the baking time and temperature is crucial for reaching that excellent crust.
Don’t be afraid to regulate based mostly on your oven’s characteristics.
The secret is persistence and experimentation; each try will convey you closer to mastering that excellent gluten-free crust.
Baking Strategies for a Perfect Crust
Achieving an ideal crust on gluten-free bread presents distinctive challenges, as the lack of gluten impacts structure and browning.
Oven Temperature: Higher oven temperatures (400-450°F or 200-230°C) are typically most popular for gluten-free breads. This helps to advertise speedy browning and crust formation earlier than the inside turns into overcooked.
However, be conscious of your particular oven; some ovens run hotter than others. A lower starting temperature may be needed if you discover the crust burning before the within is baked by way of.
Consider utilizing a pizza stone or baking metal. These supplies retain heat exceptionally properly, making a more even baking surroundings and contributing to a crispier crust.
Preheating the oven and the pizza stone/baking metal for no less than half-hour is crucial for optimal outcomes. This ensures consistent warmth switch to the bread.
Baking Time: Baking instances for gluten-free bread vary extensively primarily based on elements like recipe, elements, pan measurement, and oven temperature. A general guideline is 45-60 minutes, however careful monitoring is important.
Begin checking for doneness around the 45-minute mark using a digital thermometer. The inside temperature ought to ideally attain 200-210°F (93-99°C) for a well-baked loaf.
If the crust is browning too quickly but the inside remains to be undercooked, you can tent the loaf loosely with aluminum foil to decelerate browning while allowing the inside to complete baking.
Conversely, if the crust is pale and the inside is cooked, increase the oven temperature slightly for the remaining baking time to enhance browning.
Baking Strategies for Enhanced Crust Development:
Egg Wash: Brushing the loaf with an egg wash (beaten egg with a splash of milk or water) earlier than baking promotes a richer color and a slightly glossier crust.
Steam Injection: Introducing steam into the oven during the initial levels of baking helps to create a crispier crust. This could be achieved by inserting a pan of boiling water on the oven flooring or using a steam injection function if your oven has one.
Fat Content: The sort and amount of fat within the recipe affect crust formation. Recipes with greater fats content usually result in a softer crust, whereas lower fats recipes can yield a crispier crust. Experiment to search out the proper stability for your preferences.
Hydrocolloids: The addition of hydrocolloids like xanthan gum or guar gum helps to bind the elements and improve the crumb structure, not directly influencing crust development.
Recipe Formulation: Different gluten-free flour blends behave in a different way. Experiment with totally different flour blends to search out one that produces the desired crust characteristics.
Pan Selection: Darker-colored pans take up warmth extra effectively, selling sooner browning. Lighter-colored pans lead to a more even bake however might require barely longer baking occasions.
Cooling: Once the bread is baked, allow it to chill completely on a wire rack before slicing. This prevents a soggy bottom and permits the crust to firm up additional.
Mastering the perfect gluten-free crust is a process of trial and error. Careful remark, adjustments to temperature and time, and experimenting with numerous methods will result in consistently delicious outcomes.
Achieving a perfect, crisp crust on gluten-free bread presents distinctive challenges as a end result of absence of gluten’s ability to create structure and browning.
One essential technique is maximizing floor moisture while simultaneously making certain a dry enough inside to prevent sogginess.
This delicate steadiness could be achieved through a quantity of methods.
First, think about the ingredients. Use a mix of starches and flours, similar to tapioca starch, potato starch, brown rice flour, and almond flour, to optimize texture and browning.
Each flour contributes in a different way to the ultimate product; experimentation is essential to discovering the perfect mixture for your most popular crust.
Next, give consideration to the hydration stage of your dough. Slightly drier doughs often result in crispier crusts, however be cautious to not over-dry, which outcomes in a crumbly interior.
The addition of psyllium husk or xanthan gum can improve the construction and maintain moisture throughout the dough, not directly contributing to a crispier crust.
Pre-baking the crust can significantly enhance its improvement. This could be achieved through a short burst of excessive heat at the beginning of the baking process.
This creates a protective layer, stopping the crust from turning into overly gentle throughout the relaxation of the baking time.
Steam injection is a game-changer for gluten-free baking. Introducing steam into the oven through the preliminary levels of baking creates a humid setting.
This steam helps to gelatinize the starches on the floor of the bread, leading to a superbly browned and crisp crust.
There are a quantity of ways to inject steam:
Ice cubes: Place several ice cubes in a baking pan on the backside of the oven.
Water spray bottle: Carefully spray the oven walls with water through the first 10-15 minutes of baking. Be cautious to not spray directly onto the bread.
Steam oven: If you’ve a steam oven, make the most of its pre-programmed steam capabilities. This is essentially the most efficient and controlled way to inject steam.
Regardless of the tactic, bear in mind to vent the oven after the initial steam injection to avoid a soggy crust.
Another essential issue is oven temperature and baking time. A excessive initial temperature helps create a fast crust, while a slightly lower temperature in the course of the remaining baking time promotes even cooking.
Experiment with completely different temperatures and timings to seek out the optimum setting on your oven and recipe.
Finally, consider using a baking stone or steel. These surfaces take in and radiate warmth effectively, leading to a superior crust development.
Preheating the stone or metal thoroughly is crucial for optimum results.
By using a mix of those methods – careful ingredient selection, exact hydration, steam injection methods, and using high-quality baking surfaces – you can obtain a delightfully crisp and flavorful crust on your gluten-free bread.
Remember that practice makes perfect! Don’t be discouraged by preliminary makes an attempt; each bake provides valuable insights into the intricacies of gluten-free bread making.
Achieving a perfect crust on gluten-free bread presents unique challenges as a outcome of absence of gluten’s structure-building properties. However, with the right strategies and instruments, a crisp, golden-brown crust is within reach.
Baking stones or steel considerably improve crust growth in gluten-free bread. Their excessive warmth capability and mass enable for speedy heat switch to the dough, promoting a quick rise and intense browning.
Preheating is paramount. Heat your baking stone or metal for at least an hour, ideally longer, at the highest temperature your oven permits (usually 450-500°F or 232-260°C). A correctly preheated stone will radiate heat evenly, ensuring constant baking.
Consider the dough’s moisture content. Gluten-free doughs usually require cautious hydration management. Too much moisture results in a soggy crust, whereas too little can lead to a dry, crumbly one. Aim for a dough that is slightly cheesy but not overly wet.
Employ high-hydration methods. While counterintuitive in gluten-free baking, greater hydration (more water relative to flour) can paradoxically enhance crust improvement. The ensuing slightly wetter dough can create steam during baking, which contributes to browning and crispness.
Use a high-quality gluten-free flour mix. Look for blends that embrace quite so much of flours, such as tapioca, potato starch, rice flour, and xanthan gum. Xanthan gum acts as a binder, providing some construction that mimics gluten.
Don’t overcrowd the oven. Ensure adequate area around your bread for even warmth circulation. Overcrowding can trap steam and prevent correct browning.
Steam injection is useful. Introduce steam into the oven in the course of the first 10-15 minutes of baking. This could be done by putting a pan of boiling water on the oven flooring or spritzing the oven walls with water. The steam helps create a crisper crust.
Utilize a Dutch oven or coated baking vessel (with a baking stone/steel beneath). This creates a steamy setting just like steam injection, additional contributing to crust development. Remove the lid over the last portion of baking to permit for browning.
Experiment with totally different baking times and temperatures. Oven temperatures range, and gluten-free doughs react in a different way. Monitor your bread rigorously and regulate baking time as needed.
Consider a ultimate broil. During the last few minutes of baking, carefully broil the bread from a distance to attain a deeper golden-brown shade and crispier crust. Keep an in depth eye on it to prevent burning.
Properly cool the bread. Allow the bread to cool utterly on a wire rack earlier than slicing. This prevents sogginess from trapped steam.
Recipe experimentation is key. Try completely different gluten-free flour blends, regulate hydration ranges, and experiment with add-ins like very important wheat gluten (in small amounts) to watch their results on the crust.
- Key Takeaways for Perfect Gluten-Free Crusts:
- Preheated Baking Stone/Steel
- High-Hydration Dough
- Steam Injection
- Proper Cooling
- High-Quality Flour Blend
Troubleshooting Common Gluten-Free Crust Issues
Achieving a superbly crisp and flaky gluten-free crust may be challenging, but with careful attention to technique and ingredients, it is completely attainable.
One of the most typical issues is a soggy backside. This usually stems from an excessive quantity of moisture in the dough. Ensure your gluten-free flour blend is dry earlier than measuring; excess moisture in the flour itself can result in a soggy crust.
Another offender is using an extreme amount of liquid in the recipe. Follow the recipe instructions meticulously, and don’t be tempted to add further liquid, even when the dough appears dry. Start with the decrease end of the liquid range specified should you’re not sure.
Overmixing can also contribute to sogginess. Gluten-free doughs do not require intensive kneading; overmixing develops an extreme amount of gluten (even the small quantity present in gluten-free blends) and results in a denser, moister crust.
The baking temperature and time are crucial. A low oven temperature will end in a doughy crust, whereas an excessively excessive temperature might burn the highest before the inside is cooked by way of. Always use an oven thermometer to make sure accuracy, and adjust baking time based mostly on your oven.
Pre-baking the crust, also called blind baking, could be extraordinarily useful. This method includes partially baking the crust earlier than adding the filling. This helps to dry out the base and prevent excessive moisture absorption from the filling, thus avoiding a soggy bottom.
Consider the kind of pan you are using. Dark-colored pans take up warmth extra readily, probably resulting in over-browning and a soggy backside. Use a lighter-colored pan, or line your pan with parchment paper, which is in a position to help to regulate heat distribution.
The elements themselves can even affect the crust’s texture. Adding xanthan gum or guar gum to your gluten-free flour mix helps to bind the components and create a stronger construction, leading to a crispier crust. However, be careful not to overdo it, as too much may find yourself in a tough crust.
Adding fat, similar to butter or oil, in the best quantities helps create a tender and flaky crust. However, excess fat can lead to a greasy or soggy crust. Follow the recipe guidelines accurately and keep away from using excessively soft or melted fats.
Finally, don’t underestimate the importance of correct cooling. Allow the baked crust to chill fully in the pan earlier than slicing or serving. This allows the moisture to evenly distribute, resulting in a more secure and crisp crust.
Here’s a abstract of troubleshooting steps:
- Use a exact scale: Measure your components exactly, especially the liquids.
- Avoid overmixing: Mix solely until the ingredients are just mixed.
- Use an oven thermometer: Ensure your oven is on the appropriate temperature.
- Pre-bake your crust (blind baking): For pies and tarts, that is important for a crisp crust.
- Choose the right pan: Use a light-colored pan or line your pan with parchment paper.
- Cool utterly: Allow the crust to chill utterly within the pan earlier than slicing.
- Experiment with gluten-free flour blends: Some blends are better suited to crusts than others.
By paying close attention to these details, you possibly can considerably improve your probabilities of reaching a superbly crisp and delicious gluten-free crust each time.
Gluten-free crusts often current unique challenges compared to their gluten-containing counterparts. Achieving that excellent golden-brown, crisp exterior requires attention to several key elements.
One widespread problem is cracking. This regularly stems from inadequate moisture in the dough. Ensure your recipe makes use of the correct amount of liquid, and contemplate including a tablespoon or two of extra liquid if the dough seems too dry. Overmixing can even contribute to cracking, as it develops the gluten substitutes excessively, resulting in a tighter, extra prone-to-crack construction. Mix only till simply mixed.
Another offender behind cracking is improper baking temperature or time. Too high a temperature could cause the outside to set too rapidly, creating stress that leads to cracks as the interior expands. Lowering the oven temperature by 25°F (14°C) might assist. Conversely, baking for too brief a period could lead to a damp inside that doesn’t present enough support for the crust, inflicting it to crack because it cools.
Burning is another frequent issue. This typically signals an oven that’s too scorching or a crust that is browning too shortly. Use an oven thermometer to make sure accuracy; oven temperatures can differ. Line your baking sheet with parchment paper to forestall direct contact with the recent metal, which can lead to uneven browning and scorching.
Consider the kind of gluten-free flour blend used. Some blends comprise more starch than others, leading to a drier, extra brittle crust. Adding a fat, like melted butter or oil, may help enhance moisture retention and improve the crust’s texture. Experiment with totally different ratios of starches and flours inside a recipe to find the optimal blend in your oven and preferences.
The addition of xanthan gum or one other binder is crucial for gluten-free baking, however too much can result in a tricky and dry crust. Start with the beneficial quantity in your recipe, and cautiously improve provided that needed. Over-binding creates a inflexible structure vulnerable to cracking and burning.
Pre-baking the crust could be beneficial in some instances, especially for pies or tarts. This partially cooks the bottom, providing extra structural integrity and preventing a soggy bottom. This pre-baking helps to even out the moisture content material, decreasing the likelihood of cracking and uneven browning.
Humidity ranges can even influence crust efficiency. On notably humid days, the extra moisture in the air can make it harder for the crust to brown evenly. Consider lowering the amount of liquid in the dough barely on such days, and hold a detailed eye on the baking process.
Using a baking stone or steel can improve heat distribution and contribute to a crispier crust. These materials retain warmth effectively, promoting even baking and lowering the probability of burning or cracking.
Finally, do not be afraid to experiment! Adjusting the ingredients, baking temperature, and baking time may require some trial and error. Keep detailed notes of your changes, and soon you may master the art of creating the proper gluten-free crust.
Remember, persistence and careful observation are key. Don’t be discouraged by initial setbacks; with follow, you’ll be able to obtain constantly delicious and fantastically browned gluten-free crusts.
Gluten-free crusts usually present unique challenges in comparability with their gluten-containing counterparts. Achieving a beautiful, crisp, and golden-brown crust requires consideration to element and a nuanced understanding of gluten-free baking.
One common issue is a pale or lackluster crust colour. This often stems from insufficient browning brokers. Adding a touch of granulated sugar to the dough (around 1-2 tablespoons depending on the recipe) helps promote Maillard reaction, which is crucial for browning. Similarly, incorporating a small quantity of high-quality olive oil or melted unsalted butter can even contribute to a richer color and improved texture.
Another approach to spice up crust shade is employing a better baking temperature. While this will likely require a slight discount in baking time to stop burning, a warmer oven usually results in considerably higher browning. Experiment with rising the temperature by 25°F (14°C) in increments, observing the results rigorously.
The moisture content of the dough performs an important role. Too a lot moisture leads to a soggy crust that fails to brown properly. Using gluten-free flour blends particularly designed for bread baking could make a huge distinction. These blends typically embrace components that help take up excess moisture, leading to a drier, better-structured dough.
Ensuring the dough is correctly hydrated is also very important. Overmixing can develop an excessive quantity of gluten, even in a gluten-free context (which is normally a result of the starches forming a glue-like consistency), hindering browning. Follow the recipe’s directions meticulously, and avoid overworking the dough. Gentle handling is vital.
The kind of pan used can have an result on crust shade and texture. Darker-colored pans take up heat more effectively, promoting sooner and more even browning. Conversely, lighter-colored pans mirror warmth, potentially resulting in a paler crust. Consider using a dark-colored baking sheet or a cast-iron skillet for improved results.
Adding a steam-inducing element to the oven surroundings can lead to a more evenly browned and softer inside. This can be accomplished by inserting a pan of boiling water on the oven ground (be conscious of oven safety), or utilizing a specialized baking stone which retains moisture.
Sometimes, even with optimal techniques, the crust may still appear pale. In these cases, consider applying a glaze or egg wash over the past 5-10 minutes of baking. An egg wash supplies gloss and shade, and a easy glaze of milk, cream, or even melted butter can add a contact of richness and enhance browning.
Beyond shade, reaching the desired texture is equally necessary. A common drawback is a crumbly or overly dense crust. This usually indicates insufficient binding brokers in the gluten-free flour blend. Experiment with including psyllium husk powder, xanthan gum, or different binding brokers as specified by the recipe or advised by the flour mix manufacturer to boost cohesiveness.
Finally, patience and experimentation are very important. Gluten-free baking typically requires more changes than traditional baking. Keep meticulous notes of your changes to refine your technique. Don’t be discouraged by initial setbacks—with consistent effort, you can grasp the art of attaining a perfect gluten-free crust.
Remember to all the time preheat your oven completely, allowing it to reach the desired temperature before placing the dough in. Consistent oven temperature is important for even baking and an attractive crust.
Using a thermometer to watch both the inner temperature of the bread and the oven temperature itself can significantly improve your outcomes. Aim for the recommended inner temperature to ensure proper baking whereas preventing over-browning or under-baking.
Finally, think about the age of your gluten-free flour mix. Older flour can typically take in less moisture, affecting the dough’s texture and the crust’s outcome. Always examine the expiration date and attempt to use contemporary flour each time attainable.
Recipe Examples:
Achieving a perfect crust on gluten-free bread requires a nuanced strategy, differing considerably from gluten-containing bread baking.
Gluten’s elasticity is vital to trapping steam and creating oven spring, resulting in a crisp crust. Gluten-free flours lack this, necessitating different strategies.
Understanding Gluten-Free Flour Blends: Success hinges on the best blend. A single flour not often yields satisfactory outcomes. Common blends include almond flour, tapioca starch, potato starch, rice flour (brown and white), and xanthan gum.
Xanthan Gum’s Role: This crucial ingredient mimics gluten’s binding and elasticity, enhancing the dough’s construction and preventing crumbling.
Hydration is Key: Gluten-free doughs often require extra liquid than traditional doughs. Overly dry dough will result in a dry, brittle crust.
Baking Time and Temperature: Higher temperatures promote browning and crust improvement. A preheated Dutch oven helps entice steam, resulting in a softer crumb and crispier crust.
Egg Wash: Brushing the loaf with an egg wash (beaten egg with a splash of milk or water) before baking contributes to a wealthy golden-brown shade and sheen.
Steam Injection: Introducing steam into the oven in the course of the preliminary baking section creates a moist setting, which helps the crust develop properly with out drying out.
Recipe Example: Basic Gluten-Free Bread (with Crust Focus):
Ingredients:
1 cup brown rice flour
1/2 cup tapioca starch
1/4 cup potato starch
1/4 cup almond flour
1 teaspoon xanthan gum
1 teaspoon salt
2 teaspoons baking powder
1 tablespoon sugar (optional, enhances browning)
1 3/4 cups heat water
2 tablespoons olive oil
1 egg, beaten (for egg wash)
Instructions:
1. Preheat oven to 400°F (200°C).
2. In a large bowl, whisk together all dry components (rice flour, tapioca starch, potato starch, almond flour, xanthan gum, salt, baking powder, and sugar).
3. Add warm water and olive oil to the dry ingredients. Mix until simply combined; do not overmix.
4. Pour batter right into a greased 9×5 inch loaf pan.
5. Brush the top of the loaf with the overwhelmed egg.
6. Bake for 50-60 minutes, or until a toothpick inserted into the middle comes out clear. For an extra crispy crust, you can broil the bread for the last 2-3 minutes, preserving a detailed eye to stop burning.
7. Let the bread cool in the pan for 10 minutes before transferring it to a wire rack to cool fully.
Tips for a Crispier Crust:
• Use a Dutch oven: The enclosed surroundings retains moisture and promotes even baking, resulting in a better crust.
• Score the top of the loaf before baking: This allows for higher enlargement and a extra rustic appearance.
• Experiment with completely different flours: Adjusting the ratios of flours in your mix can influence crust texture.
• Don’t open the oven door frequently throughout baking: This releases steam and can result in a much less crisp crust.
By carefully considering flour blends, hydration, baking techniques, and using steam, you’ll have the ability to achieve a wonderfully crisp and flavorful crust in your gluten-free bread.
Achieving a perfect crust on gluten-free bread requires cautious attention to a number of key factors. Gluten, the protein network in wheat flour, is essentially answerable for the structure and crust growth in traditional bread. Since gluten-free baking omits this significant element, various methods should be employed.
Recipe Example 1: Hearty Seed-Encrusted Gluten-Free Loaf
This recipe uses a combination of xanthan gum (for binding), very important wheat gluten (for a barely improved structure, although optional), and a high-hydration dough to advertise a crisp crust.
Ingredients: 1 ½ cups gluten-free bread flour blend (with xanthan gum), ¼ cup vital wheat gluten (optional), 1 teaspoon salt, 1 teaspoon sugar, 2 teaspoons lively dry yeast, 1 ½ cups warm water, 2 tablespoons olive oil, ¼ cup sunflower seeds, ¼ cup pumpkin seeds, 2 tablespoons flax seeds.
Instructions: Combine dry components. Dissolve yeast in warm water. Add wet ingredients to dry, mixing till just mixed. Stir in seeds. Let rise in a lightly oiled bowl for 1-1.5 hours, or until doubled. Shape right into a loaf and place in a greased loaf pan. Let rise for an additional 30 minutes. Bake at 375°F (190°C) for 45-50 minutes, or till golden brown and a toothpick inserted into the middle comes out clear. For an additional crispy crust, you’ll find a way to brush the top with olive oil or egg wash before baking.
Recipe Example 2: Artisan-Style Gluten-Free Sourdough
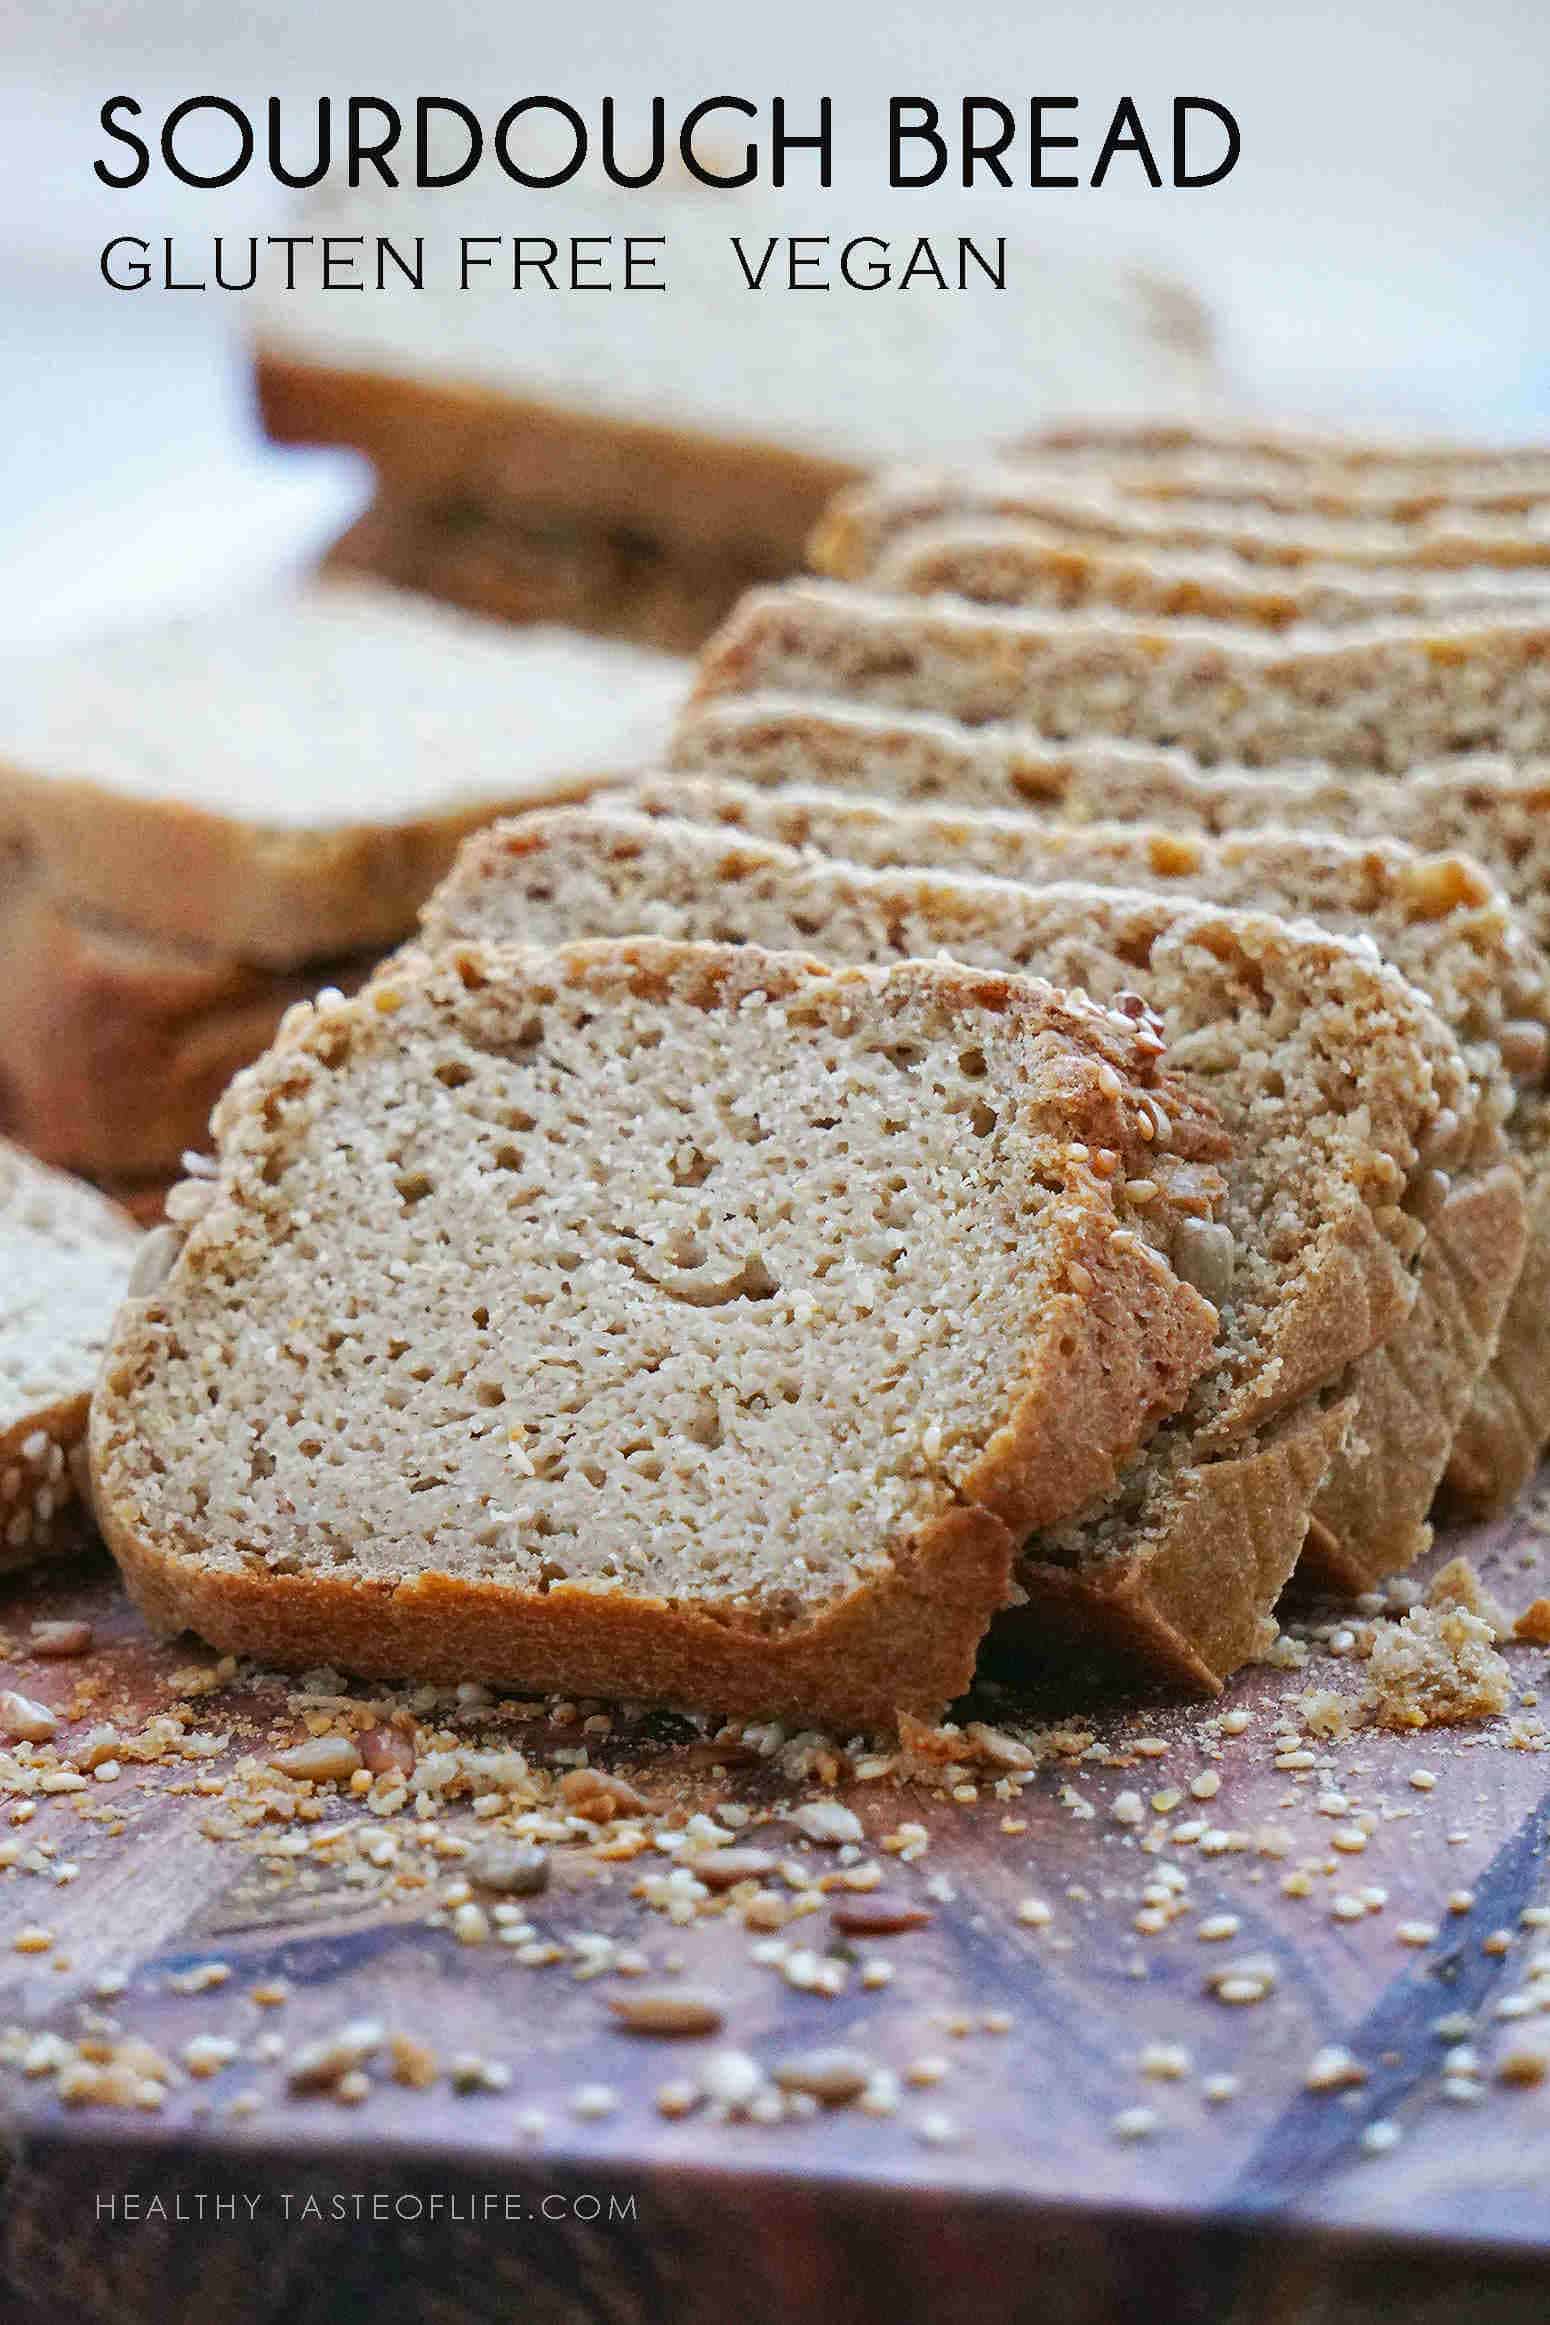
Sourdough starters contribute to a complex flavor profile and improve crust formation in gluten-free loaves, mimicking the effect of gluten in creating construction. This recipe necessitates a well-established gluten-free sourdough starter.
Ingredients: 200g lively gluten-free sourdough starter, 300g gluten-free bread flour mix (with xanthan gum), 150g warm water, 8g salt.
Instructions: Mix the starter, flour, and water until a shaggy dough varieties. Autolyse for 30 minutes. Add salt and knead until fully included. Bulk ferment for 4-6 hours, performing stretch and folds each 30 minutes for the primary hour. Shape the dough right into a boule or batard. Proof in a banneton lined with a floured cloth for 4-6 hours, or till almost doubled. Preheat oven to 500°F (260°C) with a Dutch oven inside. Carefully score the dough and place it in the scorching Dutch oven. Bake coated for 20 minutes, then uncover and bake for an additional 25-30 minutes, or until deeply golden brown. The Dutch oven creates steam, essential for a crisp crust.
Recipe Example three: Simple Gluten-Free Focaccia
Focaccia, with its thin crust and airy interior, is a comparatively easier gluten-free bread to achieve an excellent crust on. The high oil content aids in browning.
Ingredients: 2 cups gluten-free bread flour mix (with xanthan gum), 1 teaspoon salt, 1 teaspoon sugar, 1 packet (2 ¼ teaspoons) energetic dry yeast, 1 cup heat water, ¼ cup olive oil, herbs (rosemary, thyme), coarse sea salt.
Instructions: Combine dry components. Dissolve yeast in heat water. Add wet components to dry, mixing well. Knead briefly. Let rise in a frivolously oiled bowl for 1 hour. Stretch and press dough right into a greased baking sheet. Drizzle with olive oil, sprinkle with herbs and sea salt. Bake at 400°F (200°C) for 20-25 minutes, or until golden brown and crispy.
Tips for a Perfect Crust:
High Hydration: A slightly wetter dough creates a extra substantial crust.
Steam: Baking with steam (using a Dutch oven or creating steam in your oven) helps develop a crispier crust.
High Oven Temperature: A sizzling oven helps with browning and crispiness.
Egg Wash or Oil Wash: Brushing the highest with an egg wash or olive oil before baking adds shine and contributes to browning.
Proper Proofing: Allowing the dough adequate time to proof (rise) develops taste and texture and contributes to a greater crust.
Achieving an ideal crust on gluten-free bread requires a nuanced understanding of gluten-free baking, as the absence of gluten impacts the structure and browning considerably.
Understanding the Challenges: Gluten, the protein in wheat, supplies elasticity and construction, contributing significantly to crust improvement. Gluten-free flours lack this protein, resulting in a crumb that may be dense and a crust which could be pale and delicate.
Recipe Example 1: Sweet Gluten-Free Banana Bread with a Crisp Crust
This recipe depends on the pure sugars in bananas to promote browning and moisture to create a tender crumb that contrasts with a agency, barely caramelized crust.
Ingredients: three ripe bananas, mashed; 1/4 cup unsweetened applesauce; 2 massive eggs; 1/3 cup honey or maple syrup; 1 teaspoon vanilla extract; 1 half cups gluten-free all-purpose flour blend; 1 teaspoon baking soda; half teaspoon baking powder; 1/4 teaspoon salt; 1/2 cup chopped walnuts or pecans (optional); 1 tablespoon melted coconut oil (for brushing).
Method: Preheat oven to 350°F (175°C). Grease and flour a 9×5 inch loaf pan. Combine mashed bananas, applesauce, eggs, honey/maple syrup, and vanilla in a big bowl. In a separate bowl, whisk collectively flour, baking soda, baking powder, and salt. Gradually add dry elements to moist elements, mixing till simply mixed. Stir in nuts (if using). Pour batter into ready pan. Brush the highest of the batter generously with melted coconut oil.
Baking & Crust Development: Bake for 50-60 minutes, or till a picket skewer inserted into the center comes out clear. The coconut oil helps with browning and adds a subtle richness. Allow the bread to cool in the pan for 10 minutes before transferring to a wire rack to chill utterly. The longer cooling time allows the crust to set and firm up.
Recipe Example 2: Gluten-Free Cinnamon Swirl Bread with a Golden Crust
This recipe makes use of a mixture of techniques – egg wash and the next baking temperature – to create a richer, more intensely browned crust.
Ingredients: 1 cup gluten-free all-purpose flour mix; 1/2 cup tapioca starch; 1/4 cup brown sugar; 2 teaspoons baking powder; 1/2 teaspoon xanthan gum; 1/4 teaspoon salt; half cup milk (dairy or non-dairy); 1/4 cup melted unsalted butter; 1 large egg; 1 teaspoon vanilla extract; Cinnamon swirl: 1/4 cup brown sugar; 1 tablespoon floor cinnamon; 1 tablespoon melted butter; 1 egg, crushed (for egg wash).
Method: Preheat oven to 375°F (190°C). Grease and flour a 9×5 inch loaf pan. Whisk together flour mix, tapioca starch, brown sugar, baking powder, xanthan gum, and salt. In a separate bowl, mix milk, melted butter, egg, and vanilla. Add wet components to dry elements, mixing till simply combined. For the swirl, combine brown sugar, cinnamon, and melted butter. Spread half the batter within the pan, high with cinnamon mixture, and unfold remaining batter excessive.
Baking & Crust Development: Brush the top of the loaf generously with the crushed egg. The egg wash provides colour and shine, contributing to a more engaging and crispier crust. Bake for 40-45 minutes, or until golden brown and a wooden skewer inserted into the center comes out clean. Let cool fully on a wire rack.
General Tips for a Perfect Crust:
• Use a good high quality gluten-free flour blend: Look for blends that embrace xanthan gum or guar gum to assist bind the elements and enhance the feel.
• Don’t overmix the batter: Overmixing can lead to a tricky crumb and a less interesting crust.
• Consider including fat: Fats like melted butter, coconut oil, or applesauce add moisture and contribute to browning.
• Use an egg wash: An egg wash creates a glossy finish and enhances browning.
• Experiment with larger baking temperatures: A barely larger oven temperature may help promote browning, however monitor carefully to avoid burning.
• Let the bread cool completely earlier than slicing: This allows the crust to set and agency up.
By employing these strategies and experimenting with different recipes, you’ll be able to achieve a fantastically golden and crispy crust in your gluten-free sweet breads.