How To Use Cream Puffs In Food Photography
Styling Cream Puffs for Various Shoots
For a basic, elegant shoot, arrange cream puffs in a neat row or pyramid on a pristine white background. Consider including a dusting of powdered sugar for a touch of caprice.
A rustic really feel may be achieved by scattering cream puffs on a wood board, perhaps alongside some recent berries or a scattering of chocolate shavings. Vary their placement for a more pure look; don’t be afraid of some overlapping.
To create a classy picture, use a darkish background like slate or black velvet. The cream puffs will stand out superbly, particularly if lit strategically. Consider using props like silver cutlery or a fragile teacup.
For a playful, child-friendly shoot, arrange the cream puffs in a fun, disorganized sample. Use bright, colourful backgrounds and props like sprinkles, candies, and even small toys.
A close-up shot focusing on the texture and element of a single cream puff may be extremely impactful. Highlight the ethereal puff pastry and the creamy filling using shallow depth of area and soft lighting.
To showcase variety, current cream puffs with completely different toppings. Some might be dusted with powdered sugar, others drizzled with chocolate, and others topped with recent fruit. Arrange them thoughtfully to showcase the differences.
Consider using contrasting colours in your styling. For instance, vibrant cream puffs towards a muted background or vice versa. This creates visible interest and draws the eye.
Think about height and dimension. Stack cream puffs to add peak and visual curiosity, or use tiered cake stands to current them in a more elaborate style.
Natural light is usually perfect for food images. Position your cream puffs close to a window for gentle, diffused gentle. Experiment with completely different times of day to find probably the most flattering gentle.
Don’t neglect negative space! Allowing some empty area across the cream puffs prevents the picture from feeling cluttered and allows the viewer’s eye to focus on the topic.
For a extra trendy feel, think about using a minimalist strategy. A few cream puffs arranged on a simple, neutral background can be incredibly fashionable.
Use props that complement the general aesthetic. Linens, napkins, silverware, and serving dishes all contribute to the general appear and feel of the photo shoot.
Experiment with different angles. Shoot from above, from the side, and even from a low angle to seize unique perspectives.
Pay consideration to particulars. Ensure the cream puffs are evenly spaced, and that any toppings are neatly utilized. Small details can make a giant difference.
Post-processing can improve your photographs. Adjust brightness, contrast, and saturation to create a polished ultimate product.
Here’s an inventory of traditional cream puff presentation concepts:
- On a cake stand
- On a serving platter
- Arranged on a decorative doily
- In a basket
- On a rustic picket board
And a listing of potential variations:
- Chocolate-dipped cream puffs
- Cream puffs with fresh fruit
- Mini cream puffs
- Cream puffs with completely different fillings (e.g., pastry cream, vanilla pudding)
- Cream puffs with different glazes (e.g., chocolate, caramel)
For a country, selfmade feel, keep away from perfectly clean surfaces. Slightly uneven edges and a hint of imperfection add allure.
Consider using a natural linen tablecloth or a wood board as your backdrop. These textures complement the selfmade aesthetic.
Dust the cream puffs frivolously with powdered sugar. Don’t overdo it; a refined dusting is more effective than a heavy coat.
Arrange the cream puffs loosely, avoiding good symmetry. A barely haphazard arrangement feels extra casual and welcoming.
Include other rustic components in the shot: a gingham napkin, a vintage teacup, or a scattering of flour.
Use shallow depth of field to blur the background and draw consideration to the cream puffs.
Natural gentle is ideal for this style. Soft, subtle mild will improve the texture and details of the cream puffs.
For added rustic allure, use a barely weathered picket spoon or spatula to place the cream puffs.
Consider adding recent berries or fruit alongside the cream puffs for a pop of shade and visible interest.
If using a filling, let it barely peek out from the cream puff for a extra interesting, less-perfect look.
Vary the sizes of the cream puffs slightly to create a extra pure, much less uniform look.
Prop styling is essential: suppose rustic baskets, vintage cake stands, or even a easy wire rack.
To enhance the “do-it-yourself” look, perhaps barely crack a cream puff to indicate the soft interior.
Use a neutral colour palette for the background and props to let the cream puffs take middle stage.
Consider adding a handwritten recipe card or a chalkboard sign with a charming caption.
Don’t be afraid to experiment with completely different angles. Shoot from above, barely tilted, or from the facet.
For a more elevated rustic look, incorporate elements like dried flowers or herbs.
If using a glaze, purpose for a slightly uneven software. A good glaze can seem too processed.
Consider the general composition. Leave some unfavorable space around the cream puffs to forestall the image from feeling cluttered.
Use props that complement the cream puffs’ color and texture. Avoid anything too bright or distracting.
For a extra moody environment, use low-key lighting. This can create a dramatic and appealing distinction.
For a brighter, airier really feel, use overhead lighting to focus on the puffs’ fluffy texture.
Edit your photographs subtly. Avoid over-processing, as this can detract from the rustic aesthetic.
Experiment with several types of cream puffs – some filled with custard, others with chocolate, and so forth.
If shooting a sequence, vary the styling slightly in each shot to keep things fascinating.
Consider the overall mood you want to convey. Rustic can vary from cozy and heat to barely rustic-chic.
Pay consideration to detail. Even small things like the method in which the powdered sugar is applied can make a distinction.
Ultimately, the aim is to create a visually appealing image that communicates the deliciousness and homemade quality of the cream puffs.
For a basic, elegant shoot, consider arranging cream puffs in a staggered formation on a pristine white marble floor, perhaps alongside a delicate silver serving dish and a single, completely ripe strawberry.
To achieve a extra rustic, yet refined aesthetic, use a weathered wood board as your base. Scatter a few sprigs of contemporary mint or lavender around the puffs, and consider using a linen serviette subtly tucked beneath the board.
Highlight individual cream puffs through the use of shallow bowls or small, vintage plates. Place a single cream puff on each, emphasizing its delicate texture and the shiny sheen of the pastry.
Consider the lighting. Soft, subtle mild enhances the cream puff’s delicate texture and prevents harsh shadows. Natural mild close to a window, barely diffused by a sheer curtain, works wonders.
Introduce adverse space strategically. Don’t overcrowd the body. Allow for respiratory room across the cream puffs to attract the viewer’s eye to the small print and textures.
For a modern, minimalist approach, use a monochromatic shade scheme. A stark white background with cream puffs organized in geometric patterns creates a sophisticated and modern really feel. Avoid unnecessary props.
Explore various angles. Shoot from above for a clear, overhead view, showcasing the sample and arrangement. A barely decrease angle, shooting throughout the puffs, can create a more intimate and welcoming really feel.
Play with textures. Introduce components that complement the cream puffs’ delicate texture, similar to crisp linens, clean marble, or the tough texture of wooden. The contrast enhances the overall visible appeal.
Incorporate garnishes thoughtfully. A dusting of powdered sugar, a drizzle of chocolate sauce, or a quantity of fresh berries can add visual interest without overpowering the cream puffs.
For an expensive really feel, use gold or silver accents. A gold leaf, delicately placed on one puff, or a silver serving tray can elevate the presentation to a better stage of sophistication.
Consider the color of the cream filling. If utilizing a colourful filling, similar to chocolate or raspberry, let the color be a focus. Use a background that contrasts fantastically with the filling’s hue.
If showcasing quite a lot of cream puffs, maybe with different toppings, prepare them strategically to spotlight the differences. Use color and texture to create visual separation between the categories.
Don’t forget about depth of area. A shallow depth of subject can blur the background, drawing focus to the cream puffs in the foreground, making them the stars of the show.
Pre-plan your pictures. Sketch out completely different arrangements beforehand. Experiment with totally different props and angles to make sure your imaginative and prescient is clearly defined earlier than you begin shooting.
Post-processing can enhance the final picture. Subtle changes to brightness, distinction, and saturation can deliver out the best in your cream puff images.
Ultimately, the key to elegant and refined Cream puffs recipe puff styling is simplicity and considerate composition. Less is usually more, allowing the great point about the pastry to shine via.
Remember to always keep a clean and organized setting. A well-styled shoot reflects consideration to element, which is crucial for high-end meals images.
Consider using props that tell a narrative. A vintage teacup, a superbly engraved spoon, or a handwritten recipe card can add narrative depth and create a extra engaging image.
Above all, let your creativity guide you. Experiment with totally different types and strategies to search out what works finest in your explicit vision and the general aesthetic you wish to convey.
Using Cream Puffs as Props
For a whimsical, lighthearted really feel, think about using cream puffs as props in your meals pictures, notably in a bakery setting.
A easy association of cream puffs of varying sizes and fillings on a rustic wooden board can create a charming and appetizing image.
Think about the lighting. Soft, subtle mild will spotlight the delicate texture of the cream puffs and prevent harsh shadows.
Use a shallow depth of subject to blur the background and focus attention on the cream puffs themselves, making them the stars of the shot.
Consider a color palette. Pastel-colored cream puffs will look stunning in opposition to a darker background, whereas chocolate-dipped cream puffs would possibly pop in opposition to a light, ethereal setting.
For a extra dynamic composition, organize the cream puffs in a barely messy, yet aesthetically pleasing pile, suggesting abundance and deliciousness.
Include supporting props corresponding to a classic whisk, a flour-dusted pastry bag, or a wooden rolling pin to emphasize the bakery setting.
A rustic desk cloth or a wood countertop can provide a heat and alluring backdrop.
Don’t overlook concerning the details. A scattering of powdered sugar or a couple of strategically positioned berries can add visual curiosity.
Include some partially eaten cream puffs to convey the concept of indulgence and deliciousness. A chunk taken out provides a way of realism.
To enhance the bakery atmosphere, incorporate other baked items such as croissants, macarons, or cookies to create a fuller scene.
Consider different angles. A high-angle shot can showcase the cream puffs’ overall association, whereas a close-up shot emphasizes their texture and particulars.
Experiment with different textures. The smooth surface of the cream puffs contrasts beautifully with the tough texture of a wooden board or a linen material.
Use a big selection of fillings for the cream puffs. Chocolate, vanilla, and fruit fillings will add variety in color and texture, making for more visually appealing images.
Remember to keep up a balance between cream puffs and other elements in the frame, preventing any single element from overpowering the others.
Pay attention to the overall aesthetic. Maintain consistency in style and color scheme to make sure a cohesive and visually appealing final picture.
For an expert look, consider using a tripod to keep your digicam regular and keep away from blurry pictures.
Post-processing can enhance the photographs. Adjusting brightness, distinction, and saturation can help to spotlight the cream puffs’ enchantment.
Here’s a checklist for successful cream puff images:
- Choose an acceptable background.
- Arrange cream puffs creatively.
- Use applicable lighting.
- Include supporting props.
- Pay consideration to particulars.
- Experiment with angles and textures.
- Utilize post-processing techniques.
By following the following tips, you probably can effectively use cream puffs as props in your food images to create beautiful and appetizing pictures.
Cream puffs, with their delicate, ethereal texture and inviting golden-brown hue, provide a singular versatility as props in meals pictures.
Their size and form make them adaptable to numerous compositions, from a single, perfectly formed puff because the centerpiece to a scattered association suggesting abundance.
Consider utilizing shallow depth of subject to isolate a cream puff, emphasizing its texture and the glistening of the pastry cream peeking via a slight crack.
Alternatively, a larger group of cream puffs can create a dynamic visual, especially when paired with contrasting elements like berries or chocolate shavings.
The color of the cream puff itself could be manipulated to create visual harmony or contrast within your photograph.
A classic golden-brown cream puff will complement earth tones and rustic backgrounds, while a subtly darker puff would possibly distinction sharply in opposition to a lightweight, pastel backdrop.
Consider utilizing powdered sugar strategically; a light-weight dusting can enhance the texture and suggest freshness, whereas a heavier coating might create a extra dramatic visual.
Using cream puffs alongside different desserts creates compelling narratives in meals images.
Imagine a cream puff nestled amongst a selection of macarons, their vibrant colors complementing the puff’s earthy tones, showcasing a big selection of textures and forms.
A cream puff paired with a slice of wealthy chocolate cake creates a decadent scene, emphasizing textures that contrast, the airy lightness of the puff contrasting the dense, darkish cake.
Think concerning the story you are making an attempt to inform. A cream puff with a scoop of artisanal ice cream suggests a cool, refreshing dessert, whereas one next to a steaming cup of espresso implies a comforting treat.
Pairing cream puffs with contemporary fruit—strawberries, raspberries, blueberries—introduces vibrant colors and contrasts the richness of the pastry with the lightness of the fruit.
The contrast in styles and sizes is also essential. A small cream puff next to a large, elaborate cake offers a sense of scale and visible interest.
The placement of the cream puffs relative to different desserts is vital; contemplate creating visual triangles or different balanced formations to information the viewer’s eye.
Using natural gentle is usually best for highlighting the textures and colors of the cream puffs and accompanying desserts. Consider positioning the desserts close to a window for soft, subtle gentle.
Consider using props in addition to different desserts to reinforce the visual appeal. A linen tablecloth, vintage silverware, or rustic wooden board can all add to the overall aesthetic.
Don’t be afraid to experiment with completely different angles and perspectives. A close-up shot would possibly emphasize the puff’s delicate texture, whereas a wider shot might showcase the whole dessert unfold.
Remember to type the cream puffs fastidiously; avoid any cracks or imperfections that detract from their visual appeal, until they are deliberately part of the narrative.
Ultimately, using cream puffs as props in meals images is about creating visually compelling and evocative photographs that seize the essence of the dessert.
By rigorously contemplating composition, lighting, and the interplay between the cream puffs and other elements, you possibly can craft really beautiful pictures.
The aim is to seize the essence of the cream puff: its gentle and ethereal texture, its delicate sweetness, and its total attract.
The right combination of props and styling can elevate a easy cream puff right into a fascinating visible centerpiece.
Cream puffs, with their delicate, ethereal texture and visually interesting golden-brown crust, provide a delightful versatility as props in food photography.
Their spherical shape creates pleasing visual symmetry, and the variations in measurement and amount permit for dynamic composition.
A single, perfectly formed cream puff can act as a focal point, drawing the viewer’s eye to the principle topic.
Conversely, a scattering of miniature cream puffs can add a way of playful abundance and whimsy.
Consider utilizing cream puffs in contrasting preparations – a tower of puffs in opposition to a minimalist background, or a cascade of puffs spilling from a bowl.
Their easy surface provides a fantastic canvas for dusting with powdered sugar, creating a textural contrast and highlighting the sunshine.
Drizzling melted chocolate or a fruit coulis onto the cream puffs introduces extra shade and visible interest.
The cream filling may be subtly manipulated to create appealing textures. A slightly overflowing filling provides a way of indulgence.
Vary the fillings themselves – pastry cream, whipped cream, fruit purees – for numerous visible results.
The puffs’ color complements a extensive range of beverages, significantly these with lighter hues.
Pairing cream puffs with a cup of coffee or tea provides a classic and comforting visual narrative.
A refreshing iced tea or lemonade paired with cream puffs evokes a summery, lighthearted temper.
Consider the colour coordination; a light-colored pastry cream contrasts nicely with a dark beverage like espresso.
Positioning a cream puff strategically near a glass of beverage can subtly recommend the beverage’s taste profile.
For example, a chocolate-filled cream puff beside a glass of milk chocolate creates a harmonious aesthetic.
The distinction between the fragile texture of the cream puff and the smoothness of a calming beverage provides visible texture.
Use shallow depth of area to blur the background, focusing consideration on the cream puff and beverage interplay.
Consider including garnishes to either the cream puff or the beverage to boost visible complexity.
A sprinkle of cinnamon on the puff or a lemon twist within the drink provides a contact of class.
Think about lighting; soft, diffused light can spotlight the airy texture of the cream puff and the glistening surface of the beverage.
Overhead lighting can emphasize the puff’s form and the finest way the light catches the powdered sugar.
Experiment with completely different angles – a slightly elevated viewpoint can create a more dramatic presentation.
Using props similar to small spoons or teacups alongside the cream puffs and beverages enhances the scene.
Careful styling is essential; keep away from overly cluttered compositions to take care of a clean and interesting visible.
Remember to take care of the freshness of your cream puffs; wilted or damaged puffs will detract from the general aesthetic.
Practice completely different preparations and lighting strategies to find what works finest in your type and vision.
The potentialities for using cream puffs as props in food images are countless, and the results are invariably scrumptious.
Highlighting Texture and Detail
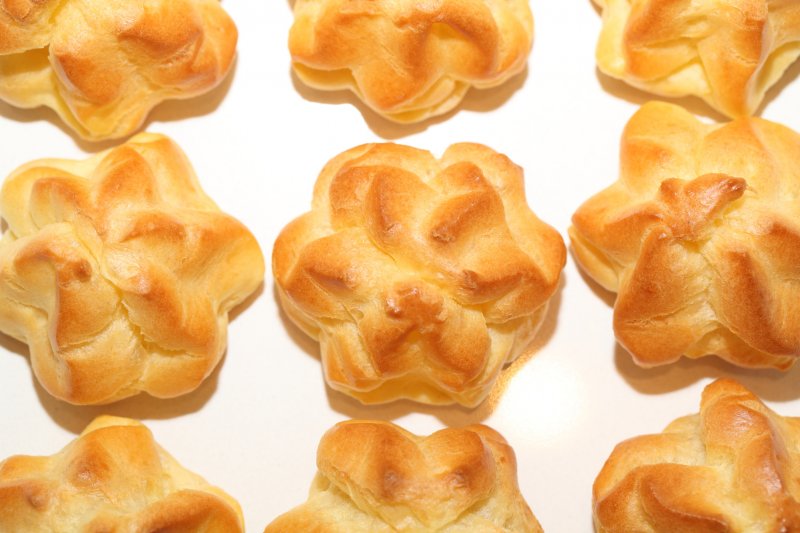
To actually showcase the fragile nature and irresistible attraction of cream puffs in food pictures, close-up pictures are important. These pictures permit you to highlight the textural intricacies that often get misplaced in wider compositions.
Begin by contemplating your lighting. Soft, diffused light is good for minimizing harsh shadows and revealing the subtle variations within the puff’s floor. A softbox or diffused window mild works wonders.
Focus intently on the pastry’s exterior. Note the delicate crispness of the choux pastry; the tiny air bubbles that contribute to its light and ethereal texture must be visible. Emphasize these details through shallow depth of area, blurring the background and drawing consideration to the sharp give attention to the puff itself.
Consider the angle. A slightly elevated angle can create a sense of grandeur, while a straight-on shot emphasizes the puff’s roundness and symmetry. Experiment with totally different views to find probably the most visually appealing view.
Highlight the contrast between the crisp, golden-brown exterior and the creamy, gentle inside. A carefully positioned slice, revealing a glimpse of the filling, can dramatically enhance the visual enchantment. This permits the viewer to imagine the texture – the yielding cream towards the firm pastry.
The cream filling itself deserves its personal close-up. Its texture ought to be clearly conveyed. Is it smooth and velvety? Are there swirls or peaks? A macro lens can seize the minute particulars, such as the glistening surface of a vanilla pastry cream or the chunky texture of a chocolate ganache.
Dusting powders, like powdered sugar, add one other layer of textural curiosity. Capture the means in which the powder clings to the pastry’s floor, creating a delicate, virtually ethereal effect. Use backlighting to make the powder shimmer and glow.
Consider adding props that subtly improve the feel. A linen napkin, a country picket board, or even a sprig of recent mint can present a visual counterpoint to the sleek curves of the puff, creating visible interest and depth.
Pay shut consideration to your composition. The rule of thirds could be helpful in guiding the viewer’s eye to an important elements – the feel and element of the cream puff. Avoid cluttering the frame; let the puff be the star of the present.
Post-processing can further enhance the texture. Slight sharpening can bring out the fine details, while careful changes to contrast and highlights can emphasize the crispness of the pastry and the richness of the filling. However, keep away from over-processing, which may make the image look artificial.
Experiment with totally different capturing styles. A dramatic close-up focusing on a single, perfectly formed puff contrasts fantastically with a slightly wider shot displaying a plate of several puffs, hinting at abundance and indulgence.
Remember, the objective is to evoke a sensory expertise. By meticulously capturing the texture and element of the cream puff, you probably can entice the viewer and make them crave a chunk.
Finally, evaluate your pictures critically. Assess the readability of the textures, the effectiveness of the lighting, and the general impact of the composition. Refine your technique with every shoot to constantly enhance your capability to showcase the magnificence of cream puffs by way of images.
Cream puffs, with their delicate, almost ethereal texture, current a singular problem and alternative in meals pictures. Mastering their visible portrayal hinges on effectively highlighting their texture and detail.
Firstly, lighting is paramount. Harsh, direct gentle will flatten the puffs, obscuring the subtle peaks and valleys of their floor. Instead, go for soft, diffused light. This can be achieved utilizing a diffuser, a large window on an overcast day, or a softbox. The objective is to create light shadows that accentuate the puff’s contours with out creating harsh, distracting highlights.
Consider the angle of your lighting. Side lighting, at a 45-degree angle, is usually perfect for bringing out texture. It casts shadows that reveal the fragile crumpling of the pastry and the delicate variations in its surface. Backlighting can also be effective, creating a luminous glow that emphasizes the puff’s fragility, however cautious consideration to publicity is crucial to keep away from overexposure.
Depth of field plays a big position in drawing the viewer’s eye to the main points. A shallow depth of field, achieved with a wide aperture (low f-stop number), can superbly blur the background, isolating the cream puff and making its texture the point of interest. This method emphasizes the creamy filling and the delicate pastry simultaneously.
The composition ought to complement the feel. Consider placing the cream puff on a texturally attention-grabbing surface—perhaps a rustic wooden board or a linen tablecloth. The distinction in textures will draw additional attention to the puff itself. Avoid backgrounds which might be too busy or distracting, permitting the cream puff to take center stage.
Focusing on the filling is essential. The creamy interior is the place much of the visual attraction lies. Consider rigorously how you present the filling: a superbly piped swirl, a luscious overflowing mound, or a gently cracked prime revealing its wealthy, creamy inside.
Here’s how to showcase the filling successfully:
- Strategic slicing: A carefully placed slice can reveal the creamy interior without compromising the puff’s total construction.
- Piping techniques: The method the cream is piped onto the puff influences its visible attraction. A well-defined swirl or peak immediately draws the eye.
- Garnishes: Subtle garnishes, like a dusting of powdered sugar or a sprinkle of chocolate shavings, can add visual curiosity with out overpowering the cream puff’s texture and the filling’s richness.
- Close-up photographs: Emphasize the filling with extremely close-up photographs, allowing the viewer to nearly taste the creamy texture.
Post-processing can subtly enhance texture and detail. Tools like sharpening and dodging and burning in photograph modifying software can help to refine the image, bringing out the refined nuances of the pastry and the creamy filling. However, it’s essential to make use of these instruments sparingly to avoid an unnatural or overly processed look.
Remember, the aim is to create a picture that not only looks scrumptious but in addition feels scrumptious, conveying the softness and richness of the cream puff by way of the visual language of photography. The secret is to pay attention to every element, from the lighting to the composition and the final edits, to create a truly fascinating image.
The delicate, nearly ephemeral nature of cream puffs presents a unique challenge in meals photography: capturing their mild, ethereal texture with out dropping the crispness of their shell.
Achieving this requires a multifaceted strategy, beginning with strategic lighting.
Soft, subtle light is essential to preventing harsh shadows that may obscure the delicate textures. Side lighting, perhaps from a window or a softbox, will gently graze the floor of the puff, highlighting the delicate peaks and valleys of the choux pastry.
Consider utilizing a reflector to bounce gentle back onto the shadowed facet, additional illuminating the subtle particulars and enhancing the three-dimensionality of the cream puff.
Depth of field plays an important position. A shallow depth of field, achieved with a large aperture (low f-stop number), will blur the background and draw attention to the crisp shell of the cream puff, making it the star of the image.
However, be conscious to not blur the puff itself excessively; a slightly softer concentrate on the creamy filling is appropriate, however the shell should stay sharply defined.
Careful styling is important. Consider the setting; a rustic wooden board can complement the basic elegance of the cream puff, while a contemporary, minimalist background will emphasize its clear lines and delicate texture.
The angle of the shot can drastically alter the perception of texture. A slightly elevated angle can emphasize the puff’s top and showcase the crispness of the perimeters.
Macro photography can be invaluable in revealing the minute details of the shell. A close-up shot would possibly reveal the delicate network of air pockets throughout the pastry, or the nice crackle of a superbly browned floor.
Post-processing can subtly enhance the feel. Careful use of sharpening instruments can deliver out the crisp edges and nice details with out making the image seem artificial.
Avoid over-sharpening, which can create a harsh, unnatural look. Instead, apply sharpening selectively to the shell, enhancing its definition without affecting the smoother texture of the cream filling.
Consider using delicate dodging and burning techniques to additional accentuate the light and shadow enjoying throughout the surface, enhancing the visible impression of texture and depth.
Experimentation with totally different angles, lighting, and post-processing methods is crucial to mastering the art of showcasing the crispness of a cream puff shell. Each puff is unique, and the ideal approach may range barely depending on its particular person traits.
Ultimately, the objective is to translate the tactile experience of biting into a crisp, airy cream puff into a compelling visual narrative that invitations the viewer to share in the sensory delight.
Don’t overlook the significance of composition. Arrange a quantity of cream puffs in an appealing method to create a visually attention-grabbing picture, showcasing their various textures and showcasing the deliciousness of the treat.
Even refined particulars like dusting the puffs with powdered sugar can add another layer of visible curiosity and emphasize the delicate texture.
The key’s steadiness: highlighting the crisp shell without overshadowing the equally necessary creamy interior, creating an image that’s each aesthetically pleasing and mouth-wateringly scrumptious.
Lighting Techniques for Cream Puffs
Natural gentle is essential for showcasing the fragile texture and ethereal nature of cream puffs. Avoid harsh, direct daylight which can create harsh shadows and wash out the small print of the pastry.
Instead, go for gentle, diffused gentle, ideally on an overcast day or during the golden hour (the hour after dawn and the hour before sunset).
Position your cream puffs close to a window, however not directly in front of it. The indirect mild will be softer and more flattering.
Consider utilizing a sheer white curtain or diffuser to additional soften the light and forestall harsh shadows.
Experiment with different angles. Side lighting can accentuate the puff’s curves and textures, while backlighting can create a beautiful halo effect across the pastry, highlighting its delicate type.
Top lighting can work properly, however be aware of shadows it’d solid on the cream filling or toppings.
For a more dramatic impact, use a reflector to bounce gentle again onto the cream puffs, filling in shadows and enhancing particulars.
A white foam board or even a big piece of white paper can serve as a makeshift reflector.
The background is essential. A easy, impartial backdrop, such as a white or light grey floor, will forestall distractions and allow the cream puffs to take middle stage.
Consider incorporating textures like linen or wooden to add visual interest without overpowering the pastries.
Pay consideration to the arrangement of the cream puffs. A visually interesting arrangement enhances the general aesthetic.
Consider totally different compositions: a single, completely formed cream puff, a small group clustered together, or a more scattered arrangement for a less formal feel.
Add props strategically. A few sprigs of contemporary herbs, a sprinkle of powdered sugar, or a cup of espresso can improve the scene without being overwhelming.
Keep it simple. Too many props can distract from the primary topic: the delicious cream puffs.
Use a shallow depth of subject to blur the background and draw consideration to the cream puffs’ textures and details.
Achieve this by utilizing a broad aperture (low f-stop number) in your camera.
White stability is essential for accurate colour representation. Use your digicam’s auto white balance characteristic or manually regulate it to match the ambient gentle situations.
Shoot in RAW format if attainable. This permits for higher flexibility in post-processing, particularly in adjusting publicity, white steadiness, and color.
Consider these styling ideas:
- Cream puffs dusted with powdered sugar
- Cream puffs with contemporary berries
- Cream puffs drizzled with chocolate sauce
- Cream puffs organized on a rustic picket board
- Cream puffs with a scoop of ice cream
- Cream puffs sliced open to indicate the creamy filling
Remember to shoot a number of images from completely different angles and with totally different lighting setups to make certain you seize the absolute best shots.
Post-processing can improve your images, but it’s finest to start with a well-lit and styled shot. Minimal editing is often finest to maintain the natural feel and appear of your cream puffs.
Practice and patience are key. Experiment with completely different setups and lighting circumstances to seek out what works finest for you and your digital camera.
For showcasing cream puffs, especially their delicate texture and ethereal lightness, a soft, subtle gentle is crucial. Avoid harsh shadows that may make them appear dense or unappetizing.
A primary mild supply, positioned barely above and to the side of the cream puffs, will present the principle illumination. A softbox or diffuser is crucial here to melt the sunshine and stop harsh highlights.
Consider utilizing a big softbox, at least 24 inches or bigger, to make sure even coverage across the scene, minimizing harsh transitions in brightness.
The distance between the light supply and the cream puffs ought to be adjusted to regulate the depth. Closer distances yield brighter, more intense illumination, while additional distances create a softer, extra refined effect.
A secondary light source, presumably a reflector or a second, smaller softbox, can be used to fill in shadows and add dimension. This fill gentle ought to be positioned opposite the primary light, creating a more balanced illumination.
The reflector’s position is crucial; experiment with its angle to subtly enhance the cream puff’s type with out overpowering the main light.
Consider the background; a impartial backdrop, slightly darker than the cream puffs, will assist them stand out. A white or light gray backdrop also can work properly, providing a clear, elegant look.
For a more dramatic impact, a back gentle can be utilized to subtly highlight the sides and create a rim mild, emphasizing the puff’s shape and texture. This light must be positioned behind the cream puffs and directed in the course of the digicam, but stored relatively low in intensity.
Avoid direct daylight; its harshness can wash out the colours and particulars of the cream puffs. If shooting near a window, use a sheer curtain or diffuser to melt the light.
The shade temperature of your light sources can be important. A slightly warmer shade temperature (around 5000-5500K) can enhance the cream puff’s golden brown color and create a warmer, more inviting really feel.
Experiment with totally different gentle setups to find what works greatest for your particular cream puffs and desired aesthetic. Take check photographs and adjust the sunshine positioning and depth till you achieve the specified look.
For close-up photographs emphasizing the cream filling, consider using a macro lens and doubtlessly a hoop flash or a small, diffused light supply very close to the subject. This will guarantee even illumination of the delicate details.
Pay consideration to specular highlights on the cream; refined highlights can improve the texture and gloss, whereas overly shiny spots can distract from the overall image.
Remember to calibrate your digital camera’s white stability to precisely symbolize the colors of the cream puffs. Shooting in RAW format permits for larger flexibility in post-processing to fine-tune the lighting and colours.
Using a mixture of softboxes, reflectors, and doubtlessly a backlight, you’ll have the ability to create a well-lit and visually appealing picture that perfectly showcases the deliciousness of your cream puffs.
Don’t be afraid to experiment with completely different angles and lighting setups to capture the cream puffs’ distinctive texture and appeal from varied views.
Finally, think about adding some subtle props, like a dusting of powdered sugar or a few contemporary berries, to boost the visual attraction and create a more engaging composition.
High-key lighting is your good friend when photographing cream puffs. Their delicate nature and light-weight, ethereal texture benefit from brilliant, even illumination that minimizes harsh shadows.
Start with a large softbox as your primary mild source, positioned barely above and to the side of your topic. This creates a mild, diffused light that illuminates the puff evenly without harsh highlights or deep shadows.
A reflector, placed reverse the principle light source, bounces gentle again onto the shadowed facet of the cream puff, filling in those areas and stopping them from showing too darkish or muddy. A white or silver reflector will work properly; silver will provide a extra intense reflection.
Experiment with the reflector’s distance and angle. Moving it nearer will increase the fill light, while moving it further away will scale back it. Adjusting the angle will change where the sunshine is reflected, allowing you to fine-tune the highlight and shadow steadiness.
Consider using a fill card (a small white card or foam board) to subtly management particular highlights. This is especially useful for minimizing overly bright spots on the cream or glaze.
For a extra dramatic effect, you probably can add a refined back light. This could be achieved with a smaller softbox or perhaps a ring light positioned behind the cream puff. This will create a delicate rim gentle, outlining the puff and separating it from the background, including depth and dimension.
Diffuse the backlight utilizing a diffuser similar to a sheer fabric or a diffusion filter to avoid harsh highlights or blown-out areas.
When working with a quantity of cream puffs, think about using a quantity of mild sources to keep up even illumination throughout all the topics. This might contain extra softboxes, reflectors, or strategically positioned fill playing cards.
The background plays a crucial role. A light-colored, impartial background will prevent it from competing with the cream puffs and maintain the focus on their delicate options. Consider utilizing a white seamless paper or a light-colored cloth backdrop.
Pay close attention to the texture of the cream puff. The lighting should spotlight the delicate puffs of pastry and the graceful, creamy filling. Avoid harsh shadows that would obscure these textures.
Use a polarizing filter on your digital camera lens to minimize reflections from the glossy cream or glaze. This will be sure that the textures and details remain clear and visible.
Experiment with completely different lighting setups and observe how they affect the looks of the cream puffs. Take test shots and regulate your lighting accordingly till you obtain the desired appear and feel.
Here’s a step-by-step information for a basic setup:
- Position your primary gentle source (large softbox) slightly above and to the aspect.
- Place a reflector reverse the primary mild supply to fill in shadows.
- Add a subtle backlight (optional) utilizing a subtle light source.
- Use a fill card to control highlights as needed.
- Choose a light, neutral background.
Remember to shoot in RAW format to allow for higher flexibility in post-processing. This lets you fine-tune the exposure, contrast, and other features of your images after the shoot.
Color Coordination and Backgrounds
Cream puffs, with their delicate, ethereal texture and infrequently subtly sweet taste, current a unique challenge and alternative in food images. The key to showcasing them successfully lies in careful colour coordination and background choice.
Against a stark white background, the cream puff can sometimes seem flat and lack visible interest. While a pure white backdrop can work for showcasing the puff’s texture, it often wants additional elements to prevent it from disappearing into the background.
A subtly textured background, like a linen tablecloth in a creamy off-white or a pale beige, can add warmth and depth without overpowering the fragile cream puff.
Consider the colour of the cream filling. If it is a basic vanilla custard, pastel backgrounds in shades of blush pink, lavender, or mint green can complement the creamy hue without clashing. These delicate colors create a harmonious and visually interesting setting.
For chocolate-filled cream puffs, darker backgrounds can work well, however avoid something too intense. A deep chocolate brown might be too similar to the filling, creating a muddy picture. Instead, go for a rich, darkish wood surface, or a textured darkish gray background to offer a striking distinction.
If the cream puffs are dusted with powdered sugar, the background needs to subtly complement this factor. A light grey or a barely darker beige can highlight the dusting effect with out competing for attention.
Consider incorporating props to reinforce the picture. A rustic wooden board, a delicate teacup and saucer, or even a few contemporary berries strategically positioned across the cream puffs can add visual interest and context without overwhelming the principle subject.
The color of the props also needs to harmonize with both the cream puffs and the background. Avoid clashing colours or patterns that detract from the delicate nature of the cream puffs. Subtle textures like linen or wood add heat and visible interest without distracting from the meals itself.
Lighting is essential. Soft, subtle natural light is right for highlighting the airy texture of the cream puff and avoiding harsh shadows. Overly brilliant mild can wash out the color of each the cream puff and the background, lowering the visual appeal.
Experiment with completely different angles. A barely elevated perspective can show off the puff’s shape and texture, while a more in-depth, more detailed shot can highlight the creamy filling. Consider photographing the cream puff from the side to seize its delicate layers.
For cream puffs with colorful toppings, like fruit or chocolate shavings, select a background that enhances these components. If the topping is vibrant, a impartial background permits the colors to pop. If the topping is extra subtle, a slightly textured background provides visual enchantment.
Ultimately, profitable meals pictures is about creating a cohesive and visually pleasing picture. By fastidiously considering the colour coordination of the background, props, and the cream puff itself, you possibly can create stunning pictures that successfully showcase the delicate beauty and deliciousness of this classic pastry.
Remember to keep up consistency in your color palette. Avoid jarring contrasts. A unified shade scheme, whether or not warm or cool, will enhance the overall visible concord of your photograph.
Pay shut attention to the details. Even small components, like the way the powdered sugar is dusted or the association of the cream puffs, can make an enormous distinction in the final picture.
Practice is vital. Experiment with different combinations of backgrounds, props, and lighting till you discover a type that you are pleased with and that successfully showcases your cream puffs.
Cream puffs, with their delicate, ethereal texture and infrequently pastel hues, present a unique problem and alternative for food images. The key lies in understanding colour coordination and backgrounds to showcase their ethereal quality.
Complementary colours can be notably efficient. Since cream puffs incessantly function vanilla or custard fillings, which lean in the course of warm, yellowish tones, we can leverage cool complementary colors to create visible interest and contrast.
Consider using a backdrop of a muted blue or a gentle teal. These cooler shades will make the warm tones of the cream puff pop, drawing the viewer’s eye on to the pastry’s delicious details. The intensity of the blue should be carefully chosen; a very vibrant blue might overpower the delicate cream puff, while a muted version supplies a harmonious distinction.
Another efficient strategy involves using a gradient. For occasion, a background transitioning subtly from a delicate blue to a pale lavender can supply visual depth and sophistication, with out distracting from the main subject.
Alternatively, explore the complementary shade relationship with the added parts of your photo. If you’re adorning the cream puff with berries, for example, the purple tones would possibly warrant a green backdrop – perhaps a slightly desaturated olive green or a sage green – to keep away from clashing but nonetheless spotlight the cream puff.
Texture is as important as colour. While a smooth, clear background is commonly most well-liked for showcasing delicate meals like cream puffs, think about incorporating delicate textures. A linen tablecloth in a complementary colour, or a rustic picket floor with a muted blue or green wash, can add visual enchantment and context, emphasizing the cream puff’s delicate texture in distinction.
The background should always remain secondary to the cream puff. It’s a supporting player, not the star. Avoid overly busy or brightly coloured backgrounds that can compete with the subject and detract from its interesting traits.
Lighting is crucial. Soft, subtle lighting is ideal for highlighting the fragile particulars of the cream puff’s texture and the subtle shading of its glaze or frosting with out creating harsh shadows. Natural mild filtered via a sheer curtain is usually excellent.
To summarize effective complementary color pairings for cream puffs in food pictures:
- Warm Cream Puffs + Cool Blue/Teal Backgrounds
- Vanilla Cream Puffs + Muted Green Backgrounds (if utilizing green garnishes)
- Pastel Cream Puffs + Soft Lavender or Grey Backgrounds
- Chocolate Cream Puffs (a warmer tone) + Cool Mint Green or Light Purple Backgrounds
Remember to experiment! The finest background in your cream puff images will depend on the precise styling, the type of cream puff, and the overall aesthetic you’re aiming for. The aim is at all times to boost the cream puff, to not distract from it.
Finally, modifying can fine-tune your shade coordination. Subtle changes to brightness, contrast, and saturation in post-processing can additional improve the visual impression of your image and refine the interplay of the cream puff and its background.
Choosing a color palette is paramount when planning a themed photoshoot, particularly one centered round cream puffs. The delicate nature of cream puffs lends itself to pastel shades, but don’t restrict your self.
Consider the overall temper you want to evoke. A rustic theme would possibly name for heat, earthy tones like browns, lotions, and muted greens, perhaps with a burlap tablecloth or picket backdrop.
A more trendy aesthetic might make the most of clean, minimalist backgrounds in white, gray, or maybe a muted pastel blue, emphasizing the cream puffs’ texture and shape.
A vibrant, playful photoshoot may incorporate bolder colors, such as a bright yellow or coral, maybe using these as accents against a neutral backdrop.
Backgrounds should all the time complement the subject, not compete with it. A busy background will distract from the cream puffs; a simple, uncluttered background will enable them to be the focal point.
Think about textures as well. A easy, polished floor contrasts beautifully with the soft, barely irregular surface of a cream puff. Consider using linen, marble, wooden, or perhaps a simple white tablecloth.
Props play an important position in setting the scene. For a rustic theme, add elements like classic teacups, lace doilies, and wildflowers. A fashionable theme might call for sleek cutlery, minimalist ceramics, and geometric shapes.
Lighting is important. Soft, diffused mild will stop harsh shadows and highlight the creamy texture of the puffs. Natural mild near a window is ideal, however you can even use softboxes or diffusers to achieve a similar effect.
Consider the completely different parts in your composition. How will you arrange the cream puffs? Will they be individually introduced, or in a group? Will you embrace other parts, like berries, chocolate shavings, or whipped cream?
Pre-visualization is essential. Sketch out your ideas, create temper boards, and collect your props beforehand. This helps ensure a cohesive and visually interesting photoshoot.
Experiment with different angles and views. Get close-up shots to seize the feel and detail of the cream puffs, and wider photographs to showcase the overall scene and styling.
Editing is crucial. Adjust the brightness, contrast, and saturation to enhance the colors and textures of your pictures. However, avoid over-processing, aiming for a natural and appealing look.
Here are some specific examples of themed photoshoots and their corresponding shade palettes and backgrounds:
- Rustic Charm: Warm browns, lotions, muted greens; Background: Burlap tablecloth, wood desk, vintage teacups.
- Modern Minimalism: White, grey, pastels; Background: Sleek white surface, minimalist ceramics, geometric shapes.
- Vibrant & Playful: Bright yellow, coral, turquoise; Background: Bold colored floor, colorful sprinkles, enjoyable props.
- Elegant & Sophisticated: Gold, ivory, blush pink; Background: Marble surface, elegant silverware, delicate flowers.
- Sweet & Simple: Soft pinks, lotions, gentle browns; Background: White tablecloth, easy props, give attention to cream puff texture.
Remember, the secret’s to create a cohesive and visually interesting image that highlights the deliciousness of the cream puffs.
By rigorously considering color coordination, backgrounds, props, and lighting, you possibly can create stunning food images that will depart viewers craving a bite.
Don’t be afraid to experiment and develop your personal unique type. The potentialities are endless!
Post-Processing and Editing
This response is about post-processing and enhancing, specifically adjusting brightness and contrast, not about cream puffs in meals images.
Brightness and contrast are fundamental adjustments in post-processing, impacting the general look and feel of an image. Brightness controls the overall lightness or darkness of the picture. Increasing brightness lightens the whole picture, whereas reducing it darkens it. This is commonly the primary adjustment made, setting the muse for other edits.
Contrast, however, adjusts the difference between the lightest and darkest components of an image. High distinction photographs have stark variations between mild and shadow, creating a dramatic, sometimes harsh, look. Low contrast images have subtle differences, appearing softer and extra muted.
Many software programs and purposes offer intuitive methods to control brightness and distinction. Sliders are common, permitting for precise changes. Some software may use a curve editor, giving more granular management by adjusting particular tonal ranges inside the picture.
Histogram evaluation is crucial when adjusting brightness and distinction. The histogram visually represents the tonal distribution of the picture, exhibiting the frequency of pixels at every brightness level. A histogram can information you in making acceptable changes. A histogram that is heavily skewed to at least one aspect (too a lot dark or light) suggests a necessity to adjust brightness. A flat histogram indicates low distinction.
Over-adjusting both brightness or distinction can lead to problems. Increasing brightness excessively can lead to washed-out highlights, shedding element in bright areas. Decreasing brightness an excessive quantity of results in crushed blacks, the place particulars in the dark areas are misplaced. Similarly, excessive distinction can create harsh shadows and blown-out highlights, whereas inadequate distinction could make the picture appear dull and lifeless.
Different pictures require totally different ranges of brightness and contrast adjustments. A brightly lit picture would possibly need less brightness improve than a darkish image. A high-key image (mostly light tones) may need much less distinction than a low-key picture (mostly darkish tones).
The ideal levels of brightness and contrast are subjective and depend on inventive intent and the specified mood. A photographer might improve distinction to create a dramatic effect or lower it to achieve a softer, more romantic feel. Experimentation is essential to finding the proper stability.
Beyond simple sliders, advanced methods exist. Local changes permit you to change brightness and distinction solely in specific areas of the image. This is very useful for highlighting a topic or correcting uneven lighting. Masking is a standard technique for this.
Software such as Adobe Photoshop, Lightroom, GIMP, and plenty of others provide complete instruments for adjusting brightness and contrast. Each software package deal may present the tools barely in a special way, but the underlying principles stay the identical.
Understanding the interaction between brightness, distinction, and the histogram is fundamental to successful picture modifying. Mastering these adjustments enhances the quality of pictures, transforming them from merely snapshots to powerful visible statements.
Always work non-destructively each time possible. This means applying adjustments in a means that lets you revert to the unique image if needed, or modify the settings later without compromising the unique data.
Finally, do not neglect that the objective is to reinforce the image, not to create one thing synthetic or unrealistic. Subtle adjustments often yield one of the best outcomes, bringing out the pure fantastic thing about the photograph.
While cream puffs themselves aren’t instantly involved in color and saturation adjustments, their presence in a photograph significantly impacts how these post-processing strategies are applied.
The pale, creamy colour of a cream puff necessitates cautious consideration of white stability. An inaccurate white steadiness can lead to a yellowish or bluish cast, affecting not solely the cream puff however the whole picture.
In post-processing, instruments like curves or ranges adjustments can subtly lift the highlights, preserving the ethereal texture of the puff while stopping it from showing washed out or flat.
Selective colour adjustments can improve the good and cozy tones of the pastry, emphasizing the golden-brown hue of the choux pastry with out affecting the cool tones of a attainable accompanying glaze or filling.
Saturation changes ought to be approached cautiously. Over-saturation could make the cream puff look artificial or unnatural. A delicate improve in saturation can, however, enhance the richness of the cream filling and the depth of the browned pastry.
Vibrance is commonly a greater alternative to saturation. Vibrance selectively boosts the saturation of less saturated colors, preserving the pure look of the cream puff while adding pop to the scene.
Masking strategies are essential for targeted changes. This permits for particular areas of the cream puff (e.g., the shiny top, the marginally shadowed sides) to receive different shade and saturation enhancements.
The background additionally performs a significant role. A contrasting background shade will have an effect on the perceived color and saturation of the cream puff. Post-processing may contain colour correction to harmonize the cream puff’s colour with the background or subtly desaturate the background to draw extra consideration to the topic.
Using tools like HSL adjustments permits for very fine-tuned control. Adjusting the luminance (lightness) of particular colors can considerably have an result on the general impression of the cream puff, highlighting its texture and shape.
Consider the lighting situations through the shoot. If the picture is barely underexposed, adjustments to shadows and highlights can deliver out the refined details of the cream puff’s texture and color. Conversely, if overexposed, recovering element in the highlights with out shedding the airy high quality is important.
Finally, the general look of the image ought to be in maintaining with the desired style. A rustic style would possibly profit from slightly muted colours, whereas a brilliant and cheerful presentation might warrant extra vibrant tones. The cream puff ought to always stay the main focus, with colour and saturation changes subtly supporting its visual enchantment.
High-dynamic range (HDR) strategies, although less common for meals images, could be used to recover element in both the highlights and shadows of the cream puff, preserving its complex textures and delicate colors.
Software like Adobe Lightroom, Photoshop, or Capture One offers a extensive selection of instruments to attain the desired stage of colour and saturation refinement. Experimentation and a keen eye for element are important to reaching professional-looking outcomes.
Remember that subtlety is vital. Overly processed pictures usually seem synthetic. The aim should be to boost the pure fantastic factor about the cream puff, to not alter its look drastically.
Paying attention to the surrounding parts, similar to any accompanying fruits or sauces, is important. The general color harmony of the whole image must be thought of, ensuring a visually pleasing and coherent composition.
While cream puffs themselves do not typically have blemishes requiring removal in post-processing, the encompassing setting in a food photograph typically does. Dust motes, stray hairs, or imperfections on the serving plate want attention.
The first step is careful capturing. Using a clear backdrop and listening to detail before snapping the picture minimizes post-processing.
For eradicating minor imperfections, the Spot Healing Brush tool in Photoshop is invaluable. Its AI-powered capabilities intelligently analyze the encompassing space to seamlessly blend the imperfection away. Choose a brush dimension barely larger than the blemish for finest results, and regulate the opacity if wanted for a more pure look.
For extra complicated blemishes or bigger areas of imperfection, the Clone Stamp tool presents extra control. This requires choosing a clear space nearby and sampling its texture and shade to color over the imperfection. Careful attention to detail is essential here to keep away from apparent cloning artifacts.
The Patch tool offers another approach. Select an area encompassing the blemish, choose a supply space close by with good texture, and Photoshop will intelligently exchange the imperfection with the selected sample.
Frequency Separation is a more advanced approach best for removing texture imperfections whereas preserving details like the cream puff’s icing. This includes splitting the image into high-frequency (detail) and low-frequency (tone) layers. Work on the low-frequency layer to take away blemishes, then recombine the layers for a seamless result.
For mud motes floating in the air across the cream puff, the Content-Aware Fill is extraordinarily helpful. Simply select the mud mote, select Content-Aware Fill, and Photoshop will analyze the surrounding image to fill the area naturally.
Sometimes, easy blurring is enough. Using a small brush and the blur tool, you can subtly smooth out minor floor imperfections without fully eradicating them. Careful control is vital to keep away from making the picture seem unnatural.
If you’re using Lightroom, its therapeutic brush device functions similarly to Photoshop’s Spot Healing Brush. Lightroom also provides various adjustment brushes that can subtly right shade and tone imperfections.
In all circumstances, work non-destructively. Use adjustment layers and masking to allow for reversibility and suppleness. Avoid over-processing, which can lead to unnatural-looking photographs.
Finally, at all times zoom in to 100% to meticulously examine your work. This ensures that even minor imperfections are addressed without compromising the general picture quality.
Remember, the goal isn’t to create a flawless, synthetic image, however to boost the photograph and subtly remove distractions, allowing the cream puffs to be the star of the present.
Here’s a abstract of the instruments and techniques:
- Spot Healing Brush (Photoshop & Lightroom)
- Clone Stamp Tool (Photoshop)
- Patch Tool (Photoshop)
- Frequency Separation (Photoshop)
- Content-Aware Fill (Photoshop)
- Blur Tool (Photoshop & Lightroom)
- Adjustment Brushes (Lightroom)
By mastering these methods, you probably can considerably enhance the overall high quality of your meals photography, making your delicious cream puffs look much more appealing.